
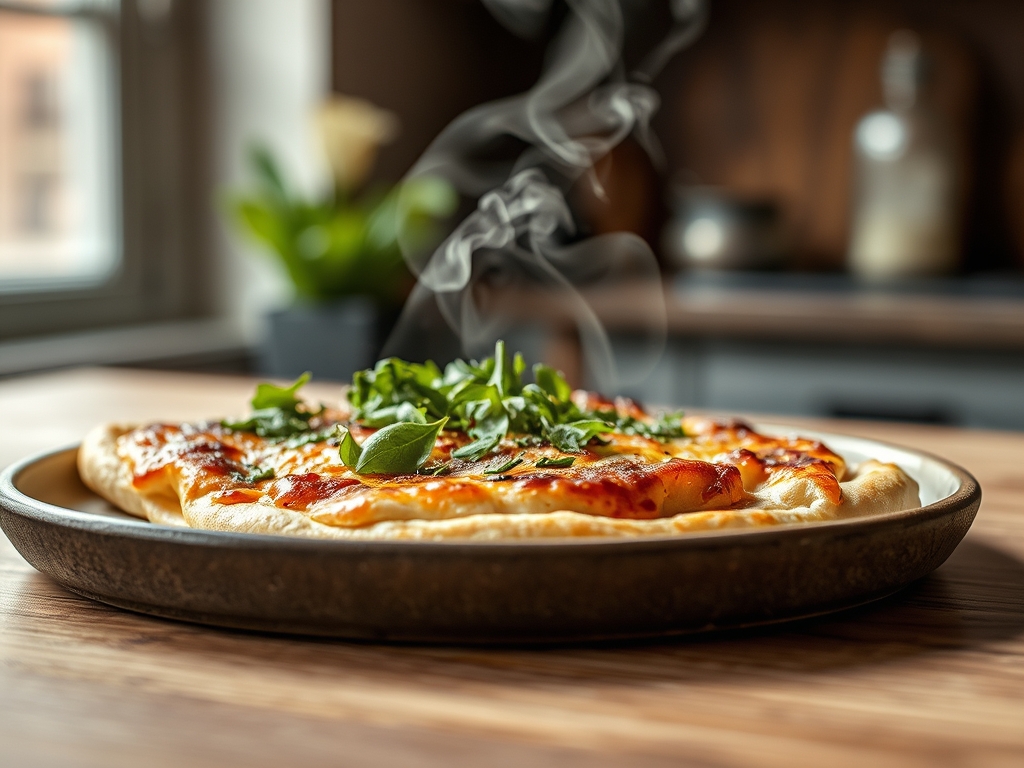
The roar of a five hundred degree oven is not merely noise; it is the sound of a thermodynamic battlefield where raw dough meets its destiny. We are not here to dally with flimsy, store-bought wraps that possess the structural integrity of a wet napkin. No, we are here to master the Stone Baked Flatbread. This is an exercise in high-velocity heat transfer and the precise manipulation of porous surfaces. When that dough hits the preheated stone, the moisture within flash-vaporizes, creating a violent expansion that forces the crumb to aerate instantly. You are looking for that specific, charred topography; those beautiful, leopard-spotted bubbles that signify a successful Maillard reaction. This is the intersection of ancient grain wisdom and modern thermal dynamics. If your kitchen does not currently smell like a scorched wheat field in the best possible way, you are doing it wrong. Prepare to audit your pantry and recalibrate your expectations, because we are about to render ordinary flour into a vessel of charred, chewy perfection.
THE DATA MATRIX
| Metric | Specification |
|---|---|
| Prep Time | 20 Minutes (plus 1 hour proof) |
| Execution Time | 3 Minutes per unit |
| Yield | 8 Flatbreads |
| Complexity (1-10) | 4 |
| Estimated Cost per Serving | $0.45 |
THE GATHERS
Ingredient Protocol:
- 500g / 3.75 cups High-Protein Bread Flour (12.5% protein minimum)
- 325ml / 1.3 cups Filtered Water (heated to 40C / 105F)
- 10g / 2 tsp Fine Sea Salt
- 7g / 2.25 tsp Active Dry Yeast
- 15ml / 1 tbsp Extra Virgin Olive Oil
- 5g / 1 tsp Honey (to accelerate the Maillard reaction)
Section A: Ingredient Quality Audit:
If your flour feels gritty or lacks the strength to hold a windowpane test, you are likely dealing with a low-protein "all-purpose" variant that will fail under high heat. Technical fix: Supplement with 10g of vital wheat gluten to reinforce the protein lattice. If your yeast fails to bloom into a viscous, foamy slurry within ten minutes, your microbial colony is likely deceased. Always audit your water temperature with a digital probe; anything over 50C will terminate your yeast, while cold water will stall the fermentation cycle and prevent the dough from reaching the necessary elasticity.
THE MASTERCLASS
1. Microbial Activation and Hydration
Combine your warm water, honey, and yeast in the bowl of a stand mixer. Allow the mixture to sit until it becomes viscous and frothy. Once activated, add the olive oil and half of the flour. Use a saucier or a small whisk to ensure no dry clumps remain before adding the salt and the remaining flour.
Pro Tip: Salt is a fermentation inhibitor. By adding it after the initial hydration phase, you allow the yeast to establish a foothold without being chemically suppressed. Use a digital scale for this; volume measurements are notoriously inaccurate for fine particulates like salt.
2. Developing the Gluten Lattice
Attach the dough hook and knead on medium speed for approximately eight minutes. The dough should transition from a shaggy mass to a smooth, elastic sphere that clears the sides of the bowl. Perform the windowpane test by stretching a small piece of dough; it should be translucent without tearing.
Pro Tip: This mechanical energy is what builds the "balloons" that will later trap steam. If the dough feels too tacky, use a bench scraper to manipulate it on a lightly floured surface rather than dumping in excess flour, which would ruin the hydration ratio.
3. The Bulk Fermentation Audit
Place the dough in a lightly oiled bowl, cover with a damp cloth, and store in a draft-free environment at 24C. Allow the volume to double. This is where the enzymes break down complex starches into simple sugars, which will eventually infuse the crust with flavor and color.
Pro Tip: A transparent fermentation vessel allows you to monitor the alveolar structure (the bubbles) from the side. This visual data is crucial for determining the exact moment the dough has reached peak gas retention before it begins to collapse.
4. Precision Portioning and Shaping
Degas the dough gently and divide it into eight equal portions (approximately 110g each). Roll each portion into a tight ball using the tension of the countertop. Cover and allow them to rest for twenty minutes to relax the gluten.
Pro Tip: If you skip the rest period, the dough will snap back like a rubber band when you try to roll it out. Using a bench scraper ensures clean cuts without tearing the delicate gluten strands you just spent an hour developing.
5. High-Heat Thermal Execution
Preheat your baking stone in the upper third of the oven at its maximum setting (usually 260C / 500F) for at least forty-five minutes. Roll each dough ball into a thin circle. Launch the dough directly onto the hot stone. Bake for 2 to 3 minutes until the bread puffs and develops dark charred spots.
Pro Tip: The baking stone acts as a thermal battery. It provides the "oven spring" necessary for that classic Stone Baked Flatbread texture. Without the porous surface of the stone to wick away moisture, the bottom of the bread would steam rather than crisp.
Section B: Prep & Timing Fault-Lines:
The most common failure in flatbread architecture is "Thermal Lag." This occurs when the baker rushes the preheating process. If the stone is not saturated with heat, the dough will sit and dry out before it can puff, resulting in a cracker-like texture rather than a soft, pillowy interior. Another critical error is over-flouring the work surface during the final roll-out; excess raw flour will burn instantly on the stone, creating a bitter, acrid smoke that masks the delicate wheat flavor.
THE VISUAL SPECTRUM
Section C: Thermal & Visual Troubleshooting:
Referencing the Masterclass photo, your Stone Baked Flatbread should exhibit "Leopard Spotting." These are localized areas of intense carbonization surrounded by a pale, golden-tan crust. If your bread is a uniform, dull beige, your oven temperature is too low or your dough lacked sufficient sugars (honey) to trigger the Maillard reaction. If the bread is stiff and lacks flexibility, you have over-baked it; the window between "perfectly charred" and "dehydrated" is often less than thirty seconds. A successful bake will show a clear "pocket" or significant internal aeration when torn, indicating the steam was successfully trapped by a strong gluten network.
THE DEEP DIVE
Macro Nutrition Profile:
Each serving (one flatbread) contains approximately 240 calories, 8g of protein, 45g of carbohydrates, and 4g of fat. The high protein content from the bread flour provides a lower glycemic index compared to standard white breads, leading to more sustained energy release.
Dietary Swaps:
- Vegan: This protocol is inherently vegan as honey can be substituted with agave nectar or simple sugar to provide the necessary carbohydrates for the yeast.
- Keto: Replace wheat flour with a blend of almond flour, vital wheat gluten, and xanthan gum. Note that the "puff" will be significantly reduced due to the lack of starch.
- GF: Use a high-quality 1-to-1 gluten-free flour blend containing psyllium husk to mimic the elasticity of gluten.
Meal Prep & Reheating Science:
To maintain the molecular structure, store flatbreads in an airtight container with a piece of parchment paper between each. To reheat, do not use a microwave; this causes the starch molecules to undergo rapid retrogradation, turning the bread rubbery. Instead, flash-heat in a dry skillet for 30 seconds per side to re-crisp the exterior while maintaining a soft interior.
THE KITCHEN TABLE
Why is my flatbread tough instead of chewy?
This usually indicates under-hydration or over-working the dough without sufficient resting. Ensure your water-to-flour ratio is accurate and allow the gluten to relax for the full twenty minutes before the final roll-out to ensure a tender crumb.
Can I make this without a baking stone?
Yes, though the thermal transfer is less efficient. Use a heavy cast-iron skillet flipped upside down. Preheat it just as you would the stone. The goal is high thermal mass to trigger the immediate evaporation of internal moisture.
My dough isn't rising at all. What happened?
Check your salt contact and water temperature. If salt touched the yeast directly before hydration, or if your water was over 50C, the yeast cells likely perished. Always bloom your yeast in a separate "safe zone" first.
How do I get those big bubbles?
The bubbles are a result of "Oven Spring." This requires a very hot surface and a dough that has been properly proofed. If you degas the dough too aggressively right before baking, you remove the starter bubbles needed for expansion.

