
Forget the flimsy crockpots of the suburban past. We are entering the realm of heavy metal gastronomy; a world where cast iron is the sovereign ruler and heat is a precision tool rather than a blunt instrument. The Dutch Oven Pot Roast is not merely a meal; it is a structural masterpiece of slow-motion molecular transformation. Imagine a three-pound slab of chuck roast hitting a preheated, oil-slicked surface. The sound is a violent, percussive hiss as the Maillard reaction begins its work; turning raw protein into a dark, umami-rich crust. This is the foundation of the liquid thermal saturation process. As we introduce aromatics and a viscous braising liquid, the environment inside that heavy lid becomes a pressurized sanctuary of flavor. We are not just boiling meat; we are dismantling connective tissue and replacing it with a complex matrix of red wine, beef stock, and botanical essences. By the time the timer hits zero, the bovine fibers should surrender at the mere suggestion of a fork. This is culinary infrastructure at its peak.
THE DATA MATRIX
| Metric | Specification |
|---|---|
| Prep Time | 30 Minutes |
| Execution Time | 3.5 to 4 Hours |
| Yield | 6 to 8 Servings |
| Complexity (1-10) | 4 |
| Estimated Cost per Serving | $4.50 – $6.00 |
THE GATHERS
Ingredient Protocol:
- 1.4 kg / 3 lbs Beef Chuck Roast (Well-marbled)
- 30 ml / 2 tbsp High-smoke point oil (Grapeseed or Avocado)
- 500 ml / 2 cups Beef Bone Broth (Unsalted)
- 250 ml / 1 cup Dry Red Wine (Cabernet or Merlot)
- 45 g / 3 tbsp Tomato Paste
- 450 g / 1 lb Carrots (Peeled and cut into 2-inch chunks)
- 680 g / 1.5 lbs Yukon Gold Potatoes (Halved)
- 2 Large Yellow Onions (Quartered)
- 5 g / 1 tbsp Fresh Thyme
- 10 g / 2 tbsp Kosher Salt
- 5 g / 1 tsp Cracked Black Pepper
Section A: Ingredient Quality Audit:
The most common failure point in a Dutch Oven Pot Roast is selecting a cut of meat that is too lean. If you attempt this with a bottom round or a lean sirloin tip, you will end up with a dry, fibrous disaster. The chuck roast is essential because it contains the high collagen content necessary to create a viscous sauce. If your meat looks pale or lacks marbling, use a digital scale to measure out an extra 15g of tallow or butter to supplement the fat content during the sear. Another audit point: The wine. If you wouldn't drink it, do not dump it into your infrastructure. Low-quality "cooking wines" contain excessive sodium that will ruin the salinity balance of the final reduction.
THE MASTERCLASS
1. Thermal Priming and the Sear
Preheat your oven to 150C / 300F. Place your Dutch oven over medium-high heat on the stovetop. Pat the beef bone-dry with paper towels; moisture is the enemy of the crust. Season aggressively. Once the oil wisps smoke, sear the beef for 5 to 7 minutes per side until a deep mahogany crust forms.
Pro Tip: Use a bench scraper to clear any stubborn bits of charred seasoning from your cutting board before prepping vegetables. The science here is simple: a dry surface allows for immediate protein denaturation without the cooling effect of steam.
2. The Aromatic Foundation
Remove the beef and set it aside on a rimmed baking sheet. Lower the heat and add the onions and carrots. Sauté until the onions are translucent and the edges of the carrots begin to render their natural sugars. Stir in the tomato paste and cook for 2 minutes to eliminate the raw metallic taste.
Pro Tip: Use a saucier whisk to incorporate the tomato paste into the rendered fat. This creates a localized roux-like base that will later help emulsify the braising liquid.
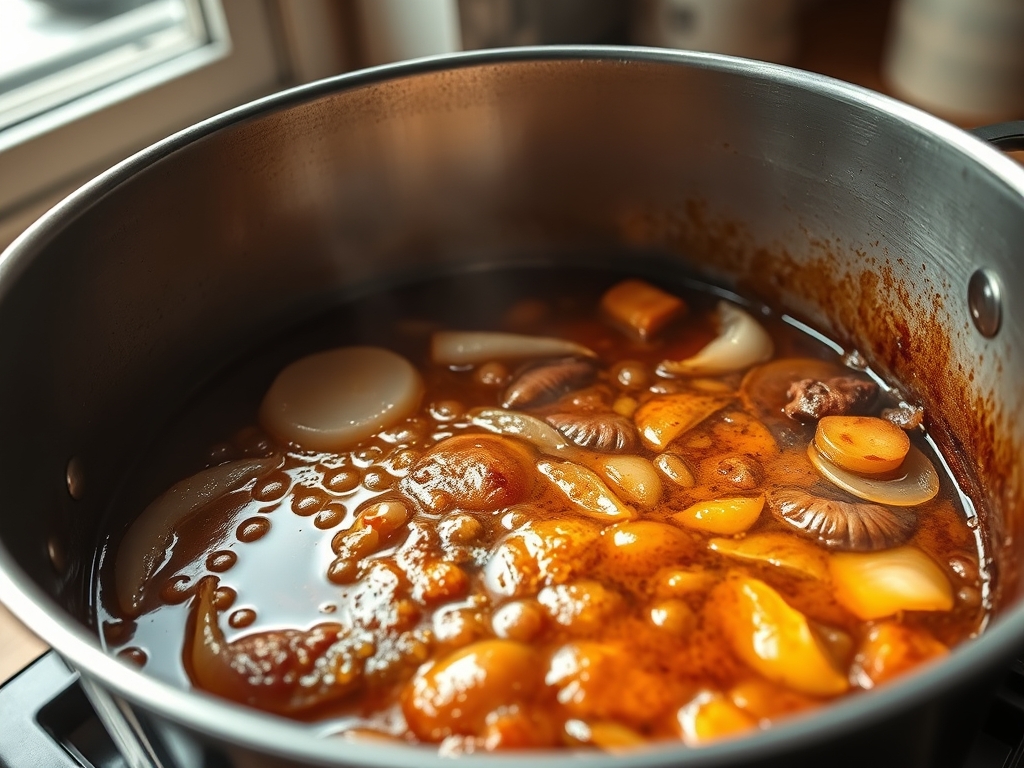
3. Deglazing the Infrastructure
Pour in the red wine. Use a wooden spoon to scrape the "fond" (the browned bits) off the bottom of the pot. This is where the soul of the dish lives. Allow the wine to reduce by half to infuse the base with concentrated acidity.
Pro Tip: A digital scale can be used to weigh the liquid if you are doubling the recipe for a large crowd; precision ensures the ratio of alcohol to fat remains optimal for flavor extraction.
4. Liquid Saturation and the Long Sleep
Return the beef to the pot along with the potatoes, herbs, and beef broth. The liquid should come up about halfway side of the roast. Bring to a simmer, then cover with a tight-fitting lid and transfer to the oven.
Pro Tip: If your Dutch oven lid isn't perfectly flush, place a piece of parchment paper between the pot and the lid. This creates a secondary seal to prevent evaporation; keeping the internal environment humid and stable.
5. The Final Reduction
After 3.5 hours, check the internal temperature. The meat should be 95C / 203F. Remove the meat and vegetables. Place the pot back on the stove and boil the liquid for 10 minutes to create a viscous glaze.
Pro Tip: Use a fat separator or a chilled spoon to remove excess surface oil. This ensures the sauce coats the meat rather than sliding off in a greasy film.
Section B: Prep & Timing Fault-Lines:
The "human element" usually fails at the temperature transition. If you pull the roast too early because you are hungry, the collagen won't have fully converted to gelatin. The result is "tough" meat. Conversely, if your oven calibration is off and it runs hot, the meat will shred into mush. Always use an external oven thermometer to verify your appliance's accuracy. If you find the liquid is disappearing too fast, your lid seal is compromised; add 100ml of water and check the seal immediately.
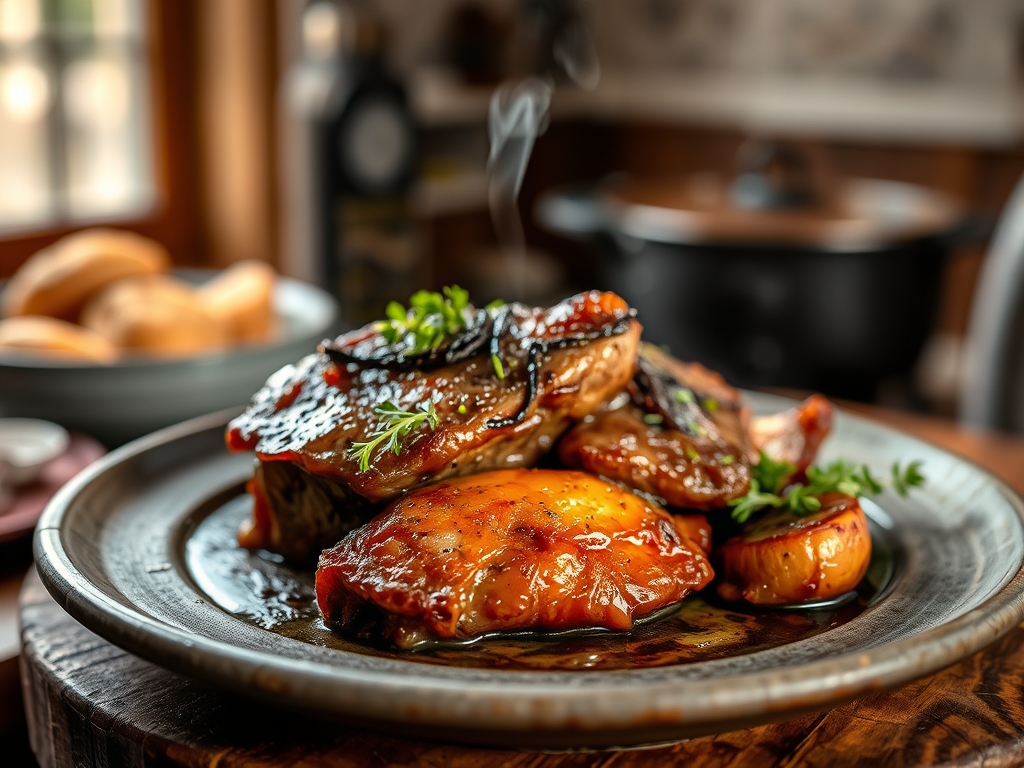
THE VISUAL SPECTRUM
Section C: Thermal & Visual Troubleshooting:
Referencing the Masterclass photo, your roast should exhibit a "glossy" sheen rather than a matte finish. A matte appearance indicates the meat has dried out or the sauce lacks enough gelatin. If your carrots look pale, they weren't seared long enough in the second step. If the potatoes are falling apart, they were cut too small for the four-hour duration. The ideal visual cue is a "shimmer" on the surface of the liquid; this indicates a perfect emulsification of fats and solids. If the sauce looks broken or oily, whisk in a cold pat of butter at the very end to aerate and stabilize the mixture.
THE DEEP DIVE
Macro Nutrition Profile
A standard serving (approx. 250g) contains roughly 450 calories, 35g of protein, 22g of fat, and 18g of carbohydrates. The high protein and fat content provide exceptional satiety.
Dietary Swaps
- Vegan: Replace bovine with large "steaks" of cauliflower or lion's mane mushrooms. Use mushroom broth and balsamic vinegar instead of wine.
- Keto: Omit the potatoes and carrots. Replace with radishes and celery root; which mimic the texture of tubers without the glycemic load.
- GF: This recipe is naturally gluten-free provided your beef broth is certified. Avoid using flour to thicken the sauce; rely on reduction instead.
Meal Prep & Reheating Science
Pot roast actually improves after 24 hours in the refrigerator. As it cools, the muscle fibers relax and soak up the surrounding sauce like a sponge. To reheat, do not use a microwave; it vibrates water molecules too violently and toughens the protein. Instead, reheat gently in a covered pan over low heat to maintain the molecular structure of the gelatin.
THE KITCHEN TABLE
Why is my pot roast still tough after 3 hours?
It likely hasn't reached the "sweet spot" of 203F. Collagen requires both time and specific heat to melt into gelatin. Give it another thirty minutes; patience is a structural requirement.
Can I skip the searing step?
You can, but you shouldn't. Searing creates the complex flavor compounds that define the dish. Without the Maillard reaction, your roast will taste like "boiled beef" rather than a gourmet masterpiece.
What is the best wine to use?
Reach for a dry, tannic red like Cabernet Sauvignon. The tannins help break down the protein fibers while the acidity balances the richness of the beef fat. Avoid sweet wines at all costs.
Why did my sauce turn out thin?
Your lid might be leaking steam, or you didn't reduce the liquid enough at the end. Remove the lid and simmer the sauce on high for ten minutes to concentrate the flavors and thickness.

