
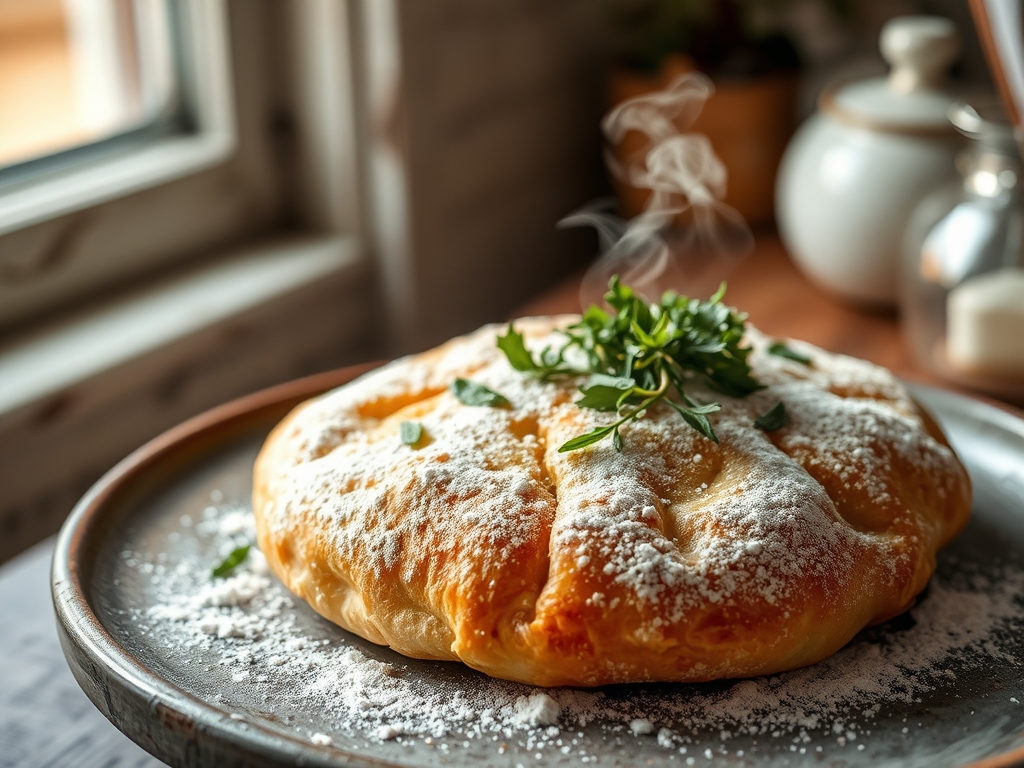
Listen to that sound. It is the sharp, percussive crackle of a perfectly executed Hand Dusted Flour Crust yielding to the blade. If your crust sounds like soggy cardboard or looks like a pale, dusty desert, your kitchen infrastructure is in a state of total systemic collapse. We are not here to bake bread; we are here to engineer a topographical masterpiece of carbonized sugars and structural proteins. This is the audit of the rustic top. We are looking for that specific matte finish, that uneven landscape of white flour against a deep, mahogany crumb that signals artisanal dominance. The Hand Dusted Flour Crust is more than an aesthetic choice; it is a functional moisture barrier and a texture multiplier. When executed with precision, it provides a bitter, toasted counterpoint to the sweet, fermented interior. If you are tired of mediocre loaves that lack shelf appeal and structural integrity, pull up a chair. We are about to strip your process down to the studs and rebuild it with industrial efficiency.
THE DATA MATRIX
| Metric | Specification |
|---|---|
| Prep Time | 20 Minutes (Active) |
| Execution Time | 18 to 22 Hours (Fermentation Included) |
| Yield | 2 Large Boules |
| Complexity | 7 / 10 |
| Estimated Cost per Serving | $0.45 USD |
THE GATHERS
Ingredient Protocol:
- 800g / 6.25 cups High-Protein Bread Flour (12.7 percent protein minimum)
- 560ml / 2.33 cups Filtered Water (Heated to 32C / 90F)
- 16g / 1.1 tbsp Fine Sea Salt
- 4g / 1 tsp Instant Yeast
- 50g / 0.4 cup Rice Flour (For the dusting protocol)
Section A: Ingredient Quality Audit:
If your flour lacks the necessary protein content, your gluten network will fail to aerate, resulting in a dense, leaden puck rather than a lofty loaf. Audit your flour by checking the side of the bag; if it is below 12 percent, you must supplement with vital wheat gluten. If your water is chlorinated, it will inhibit yeast activity. Use a charcoal filter or let the water sit out for 24 hours to dissipate the chemicals. Sub-par salt with anti-caking agents can also mute the flavor profile. Always opt for pure sea salt to ensure a piquant finish that enhances the natural sweetness of the grain.
THE MASTERCLASS
1. Autolyse and Hydration
Combine your bread flour and water in a large stainless steel bowl. Mix until no dry streaks remain. Let this mixture rest for 45 minutes. This allows the flour to fully hydrate and begins the enzymatic breakdown of starches into sugars.
Pro Tip: Use a digital scale for this step. Volumetric measurements are the enemy of consistency. Precise hydration ensures the dough remains viscous enough to hold its shape but wet enough to steam internally.
2. Salt and Yeast Integration
Sprinkle the yeast and salt over the hydrated mass. Use the "pincer method" to fold the dough over itself, squeezing the ingredients through your fingers until fully incorporated.
Pro Tip: Keep a small bowl of warm water nearby to dip your hands in. This prevents the dough from sticking to your skin without the need for excess flour, which would ruin your hydration ratios. Use a bench scraper to keep your work surface clean.
3. The Bulk Fermentation Fold
Perform four sets of "stretch and folds" every 30 minutes. Reach under the dough, pull it upward until you feel resistance, and fold it over the center. Rotate the bowl and repeat four times per set.
Pro Tip: This process builds structural tension. The bench scraper is essential here to lift the dough cleanly from the vessel. Proper tension is what allows the Hand Dusted Flour Crust to expand and crack beautifully during the bake.
4. Cold Proofing for Flavor
Place the dough in a lidded container and refrigerate for 12 to 16 hours. This slow fermentation allows organic acids to develop, creating a complex, tangy profile.
Pro Tip: Cold dough is easier to handle and score. The low temperature also slows down the yeast, preventing the dough from over-proofing and collapsing when it hits the heat of the oven.
5. Shaping and the Dusting Protocol
Turn the dough onto a lightly floured surface. Shape into a tight round. Generously coat a proofing basket with a 50/50 mix of bread flour and rice flour. This is the foundation of your Hand Dusted Flour Crust.
Pro Tip: Rice flour has a higher scorched point than wheat flour. It prevents the loaf from sticking to the basket and ensures the white "dusty" look remains bright after baking rather than turning a muddy brown.
6. The High-Heat Launch
Preheat a Dutch oven to 245C / 475F for one hour. Invert the dough into the pot, score the top with a sharp blade, and cover immediately.
Pro Tip: The lid traps the steam escaping from the dough, which gelatinizes the surface starches. This is what creates that thin, shattering Hand Dusted Flour Crust. Use a saucier to flick a few drops of water into the pot before closing for extra steam.
Section B: Prep & Timing Fault-Lines:
The most common human error is rushing the preheat. If your Dutch oven is not a heat sink, the bottom of the loaf will burn before the top can render its moisture. Use an infrared thermometer to verify the internal surface temperature. Another fault-line is the "finger-poke test" for proofing. If the dough springs back instantly, it is under-proofed. If it leaves a permanent indent, it is over-proofed. You want a slow, partial spring back for optimal oven spring.
THE VISUAL SPECTRUM
Section C: Thermal & Visual Troubleshooting:
Referencing the Masterclass photo, observe the high-contrast "ear" where the crust has peeled back. If your loaf is a uniform, dull brown, you likely lacked steam in the first 20 minutes of baking. If the flour dusting looks yellow or burnt, your oven floor is too hot; place a baking sheet on the rack below the Dutch oven to deflect direct heat. If the crust is soft 10 minutes after removal, you did not bake it long enough to infuse the crust with structural rigidity. The loaf should feel light for its size and sound hollow when tapped on the base.
THE DEEP DIVE
Macro Nutrition Profile
Each 100g serving contains approximately 240 calories, 8g of protein, 48g of carbohydrates, and 1g of fat. While it is a high-carb food, the long fermentation process lowers the glycemic index compared to commercial white bread, making it easier on blood sugar levels.
Dietary Swaps
- Vegan: Naturally vegan. Ensure your flour is not fortified with animal-derived D3.
- Gluten-Free: Substitute with a high-quality 1:1 GF blend and add 10g of psyllium husk to mimic the gluten structure.
- Keto: This specific rustic style is difficult to achieve with keto flours, but a combination of almond flour, vital wheat gluten, and oat fiber can approximate the texture.
Meal Prep & Reheating Science
To maintain the molecular structure of the Hand Dusted Flour Crust, never store it in plastic. Plastic traps moisture, turning the crust into a rubbery mess. Store in a paper bag at room temperature. To reheat, avoid the microwave; it agitates water molecules and toughens the proteins. Instead, mist the loaf with water and place it in a 175C / 350F oven for 8 minutes to re-crisp.
THE KITCHEN TABLE
Why is my flour dusting falling off?
You likely applied the flour to a dry surface. Ensure the dough has enough surface tension and slight tackiness before dusting. Using a rice flour blend also helps the dusting adhere through the high-heat expansion of the bake.
Can I use all-purpose flour instead?
You can, but the structural integrity will suffer. All-purpose flour has less gluten, meaning fewer gas bubbles are trapped. Your Hand Dusted Flour Crust will be flatter and the crumb will be significantly tighter and less airy.
How do I get a deeper color?
Remove the lid of your Dutch oven for the final 15 minutes of the bake. This allows the Maillard reaction to accelerate, turning the sugars into a deep mahogany while the rice flour dusting remains a stark, contrasting white.
My crust is too thick and hard.
This is usually caused by too much airflow in the oven or a baking temperature that is too low for too long. Ensure your Dutch oven lid fits tightly to trap steam, which keeps the crust thin and crisp.

