
Stop settling for the limp; oil-soaked sponges masquerading as artisanal bread in your local bakery. We are here to talk about the absolute physics of crust. When you commit to a Stone Baked Focaccia; you are not just baking; you are managing a high-stakes thermal exchange between a porous ceramic surface and a hydrated dough matrix. The goal is a crumb so airy it feels like a structural anomaly; supported by a base that has been fried into a golden; shatter-crisp state by the conductive power of a preheated stone. We are looking for that specific "sharding" sound when the blade hits the surface. The olive oil should not just sit on top; it must infuse into the gluten network; creating a viscous interior that contrasts violently with the charred; piquant bubbles of the surface. This is a technical audit of hydration; heat saturation; and patience. If you are still using a thin aluminum sheet pan without a thermal mass underneath; you are leaving 40 percent of your flavor profile on the table.
THE DATA MATRIX
| Metric | Specification |
|---|---|
| Prep Time | 20 Minutes (Active) / 18 Hours (Fermentation) |
| Execution Time | 25 Minutes |
| Yield | 1 Large Rectangular Loaf (12 Servings) |
| Complexity (1-10) | 6 (Hydration Management) |
| Estimated Cost per Serving | $0.85 |
THE GATHERS
Ingredient Protocol:
- 500g / 3.8 cups High-Protein Bread Flour (12.5% protein minimum)
- 400ml / 1.7 cups Filtered Water (Room temperature; 70F)
- 10g / 2 tsp Fine Sea Salt
- 5g / 1.5 tsp Instant Yeast
- 100ml / 0.4 cup Extra Virgin Olive Oil (Cold-pressed)
- 15g / 1 tbsp Fresh Rosemary Sprigs
- 8g / 1.5 tsp Flaky Finishing Salt (Maldon or similar)
Section A: Ingredient Quality Audit:
If your flour lacks the necessary protein content; the dough will fail to aerate properly; resulting in a flat; dense slab rather than a towering crumb. Technical fix: Add 10g of Vital Wheat Gluten to lower-quality AP flour to reinforce the structural integrity. If your olive oil tastes metallic or flat; it has likely oxidized. Always source oil in dark glass bottles; as light exposure degrades the polyphenols required for that signature peppery finish. For yeast that has been sitting in the pantry for over six months; perform a bloom test in warm water before mixing. If it does not foam within five minutes; the biological activity is insufficient to lift a high-hydration dough.
THE MASTERCLASS
1. The Autolyse and Initial Hydration
Combine your flour and water in a large glass bowl until no dry spots remain. Cover and let rest for 30 minutes. This allows the flour to fully hydrate and begins the enzymatic breakdown of starches without mechanical interference.
Pro Tip: Use a digital scale for this step. Volumetric measurements are the enemy of consistency in high-hydration baking. The science here is "passive gluten development"; which reduces the need for intense physical kneading.
2. Salt and Yeast Integration
Sprinkle the yeast and sea salt over the hydrated mass. Use a "pincer" method with your hand to squeeze the ingredients into the dough. This ensures even distribution without tearing the nascent gluten strands.
Pro Tip: Keep a small saucier of warm water nearby to dip your hands in. Wet hands prevent the dough from sticking to your skin; allowing for a cleaner transfer of energy into the dough.
3. The Bulk Fermentation Fold
Perform four sets of "stretch and folds" every 30 minutes. Reach under the dough; pull it upward until you feel tension; and fold it over itself. Rotate the bowl 90 degrees and repeat four times per set.
Pro Tip: Use a plastic bench scraper to clear the sides of the bowl. This repetitive stretching aligns the gluten fibers; creating the strength needed to trap the carbon dioxide produced by the yeast.
4. Cold Proof Saturation
Transfer the dough to a heavily oiled container and refrigerate for 12 to 18 hours. This cold environment slows down yeast activity but allows lactobacillus bacteria to thrive; creating complex; tangy flavor compounds.
Pro Tip: Cold fermentation alters the molecular structure of the starches; making the final bread easier to digest and significantly improving the Maillard reaction during the bake.
5. The Stone Saturation and Dimpling
Place your baking stone in the oven and preheat to 500F (260C) for at least one hour. Transfer the room-temperature dough to a well-oiled parchment sheet. Use your fingertips to press deep craters into the dough; then pour the remaining olive oil over the top.
Pro Tip: The "dimpling" process isn't just aesthetic; it creates pockets where the oil can render and fry the dough from the inside out. The stone provides a massive "heat dump" that causes immediate oven spring.
Section B: Prep & Timing Fault-Lines:
The most common human error is rushing the final proof. If the dough is cold when it hits the oven; the center will remain gummy while the exterior burns. Ensure the dough has reached at least 65F internally before baking. Another failure point is the "under-preheated" stone. If the stone hasn't saturated with heat for a full hour; you will lose the conductive energy required to crisp the bottom crust; resulting in a soggy; oily base that lacks structural sound.
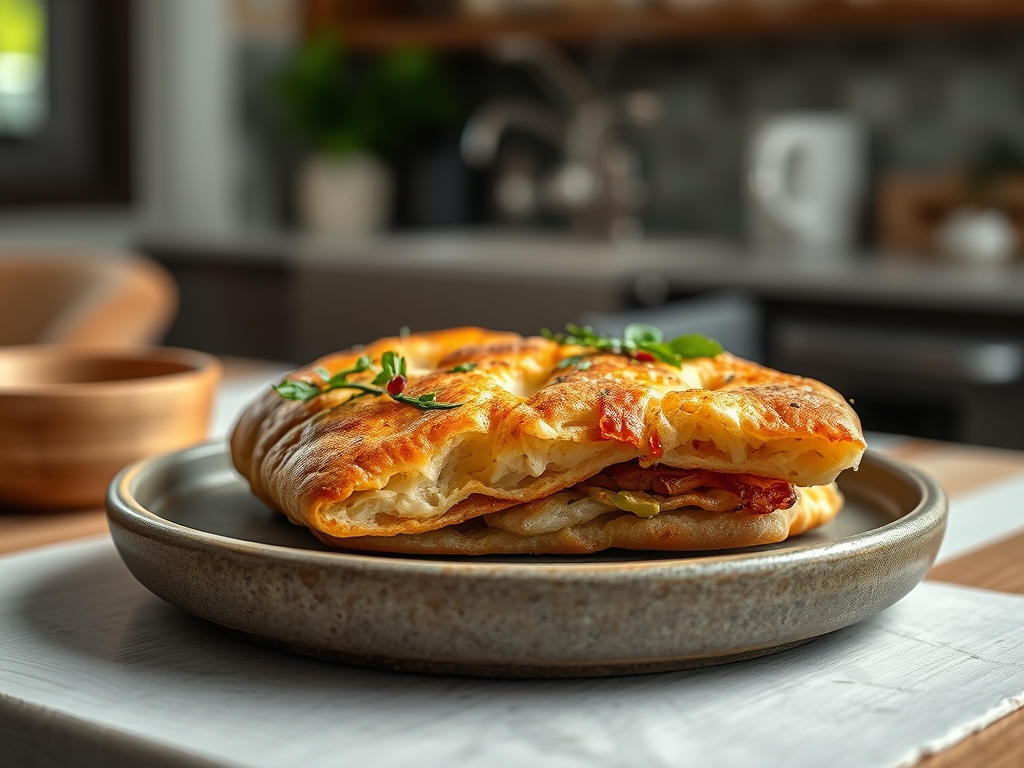
THE VISUAL SPECTRUM
Section C: Thermal & Visual Troubleshooting:
Referencing the Masterclass photo; notice the "leopard spotting" on the raised bubbles. This indicates high-heat contact and proper fermentation. If your bread is a uniform; dull tan; your oven temperature is too low or your dough is under-hydrated. If the rosemary appears charred and black; you likely added it too early or didn't coat the herbs in oil to protect them from the radiant heat. If the dimples have disappeared; the dough was over-proofed; meaning the gluten structure collapsed under its own weight. To fix "pale bottom syndrome"; move your stone to the lowest rack of the oven to maximize proximity to the heating element.
THE DEEP DIVE
Macro Nutrition Profile
Per serving (approx. 80g): 210 Calories; 9g Fat; 28g Carbohydrates; 5g Protein. The high healthy fat content from the olive oil lowers the overall Glycemic Index of the bread compared to a standard white loaf.
Dietary Swaps
- Vegan: Naturally vegan. Ensure your sugar (if used to bloom yeast) is bone-char free.
- Gluten-Free: Substitute with a high-quality 1-to-1 GF flour blend containing xanthan gum; though the crumb will be significantly tighter.
- Keto: This specific Stone Baked Focaccia relies on wheat gluten for structure; keto versions require almond flour and psyllium husk; which will not produce the same "sharding" crust.
Meal Prep & Reheating Science
To maintain molecular structure; never microwave focaccia; as this turns the starches into a rubbery mess. Reheat in a 375F oven for 5 minutes. This re-crisps the exterior oil while the interior moisture migrates back to the crumb. For long-term storage; freeze in airtight bags; the high oil content acts as a natural preservative against freezer burn.
THE KITCHEN TABLE
Why is my focaccia sticking to the stone?
You must use parchment paper or a heavy dusting of cornmeal. The stone is porous and will "grab" wet dough. Once the crust sets; the bread will release naturally; but the initial contact requires a barrier.
Can I use a cast iron skillet instead?
Yes. A cast iron skillet acts as a secondary thermal mass. Place the skillet directly on the preheated stone for a double-hit of conductive heat; which produces an exceptionally fried; crispy bottom crust.
What if I don't have 18 hours to wait?
You can proof at room temperature for 3 to 4 hours. However; you will sacrifice the depth of flavor and the "bubbly" texture seen in the audit photo. Cold fermentation is the key to professional results.
My rosemary is burning every time. Help!
Toss your herbs in a small bowl of olive oil before placing them on the dough. This creates a thermal shield. Alternatively; press the herbs deep into the dimples so they are partially submerged in the oil pool.

