
Forget the flimsy baking sheets and the delicate porcelain dishes that crack under pressure. If you want a crust that shatters like glass and a crumb that breathes with the vitality of a thousand air pockets, you must embrace the heavy metal. We are talking about the undisputed heavyweight champion of the kitchen: the seasoned cast iron skillet. This is not just a recipe; it is a structural audit of heat transfer. Cast Iron Skillet Bread is the ultimate expression of direct conduction. While a standard oven rack circulates hot air, the dense iron of a skillet acts as a thermal battery, surging heat directly into the base of the dough the moment it makes contact. This immediate thermal shock triggers an explosive oven spring, forcing the yeast into a final, frantic gasp of carbon dioxide production before the crust sets. The result is a rustic loaf with a bottom-heavy architecture that supports a towering, airy interior. It is loud, it is crunchy, and it is the only way to bake if you value structural integrity.
THE DATA MATRIX
| Metric | Specification |
|---|---|
| Prep Time | 20 Minutes (Active) |
| Execution Time | 3 Hours (Including Proofing) |
| Yield | 1 Large Rustic Loaf |
| Complexity | 4 / 10 |
| Estimated Cost per Serving | $0.45 USD |
THE GATHERS
Ingredient Protocol:
- 500g / 3.75 cups Bread Flour (High Protein)
- 375ml / 1.5 cups Filtered Water (90 degrees F)
- 10g / 2 tsp Fine Sea Salt
- 5g / 1.5 tsp Instant Yeast
- 15ml / 1 tbsp Extra Virgin Olive Oil (For skillet lubrication)
- 5g / 1 tsp Flaky Sea Salt (For topical finish)
Section A: Ingredient Quality Audit:
If your flour lacks a protein content of at least 12 percent, your loaf will lack the skeletal strength to hold its shape; it will slump into a sad, dense disc. To fix this, supplement with 10g of vital wheat gluten. If your yeast is sluggish, do not proceed. Perform a vitality check by whisking it into your warm water with a pinch of sugar; if it does not aerate and foam within five minutes, discard and replace. Water quality is often overlooked; highly chlorinated tap water can inhibit yeast activity. Use filtered water to ensure the microbial environment remains pristine.
THE MASTERCLASS
1. Hydration and Autolyse
Combine your flour and warm water in a glass bowl. Mix until no dry streaks remain. Let this shaggy mass rest for 20 minutes. This allows the flour to fully hydrate, making the dough more extensible and easier to work with.
Pro Tip: Use a digital scale for this step. Volumetric measurements are notoriously inaccurate; a "cup" of flour can vary by 20 percent depending on how tightly it is packed. Precision is the bedrock of consistency.
2. Salt and Yeast Integration
Sprinkle the sea salt and instant yeast over the hydrated dough. Use a folding motion to incorporate these elements. You are not just mixing; you are beginning to build the gluten network that will trap gases later.
Pro Tip: Use a bench scraper to manage the dough. This professional tool allows you to manipulate high-hydration doughs without it sticking to your hands, preserving the internal temperature of the mass.
3. Bulk Fermentation and Folding
Cover the bowl and let the dough rise in a warm, draft-free environment. Every 30 minutes, perform a "stretch and fold" by grabbing the edge of the dough, pulling it upward, and folding it over itself. Repeat this four times over two hours.
Pro Tip: This technique mimics mechanical kneading but is gentler. It allows the gluten to align in long strands, which will infuse the crumb with a chewy, professional texture.
4. Skillet Pre-Heating
While the dough undergoes its final proof, place your 10 or 12-inch cast iron skillet into the oven and preheat to 450 degrees F. The skillet must be scorching hot before the dough enters the chamber.
Pro Tip: A cold skillet leads to a gummy bottom. By pre-heating the iron, you ensure the Maillard reaction begins the micro-second the dough touches the metal, creating a deep, caramelized base.
5. The High-Heat Transfer
Carefully remove the hot skillet. Drizzle with olive oil and swirl to coat. Gently tip your proofed dough into the center. Use a sharp blade to score the top, then slide it back into the oven.
Pro Tip: Scoring is not just aesthetic; it provides a "pressure relief valve" for the steam. Without a clean score, the bread will rupture at its weakest point, ruining the structural symmetry.
Section B: Prep & Timing Fault-Lines:
The most common failure in skillet bread is "over-proofing." If the dough rises too long, the gluten structure weakens and collapses when it hits the heat. If your dough looks like it is deflating or covered in large, fragile bubbles, you have waited too long. Conversely, "under-proofing" results in a dense, "flying crust" where the top separates from the bottom. Watch the dough, not the clock; it should look pillowy and bounce back slowly when poked.
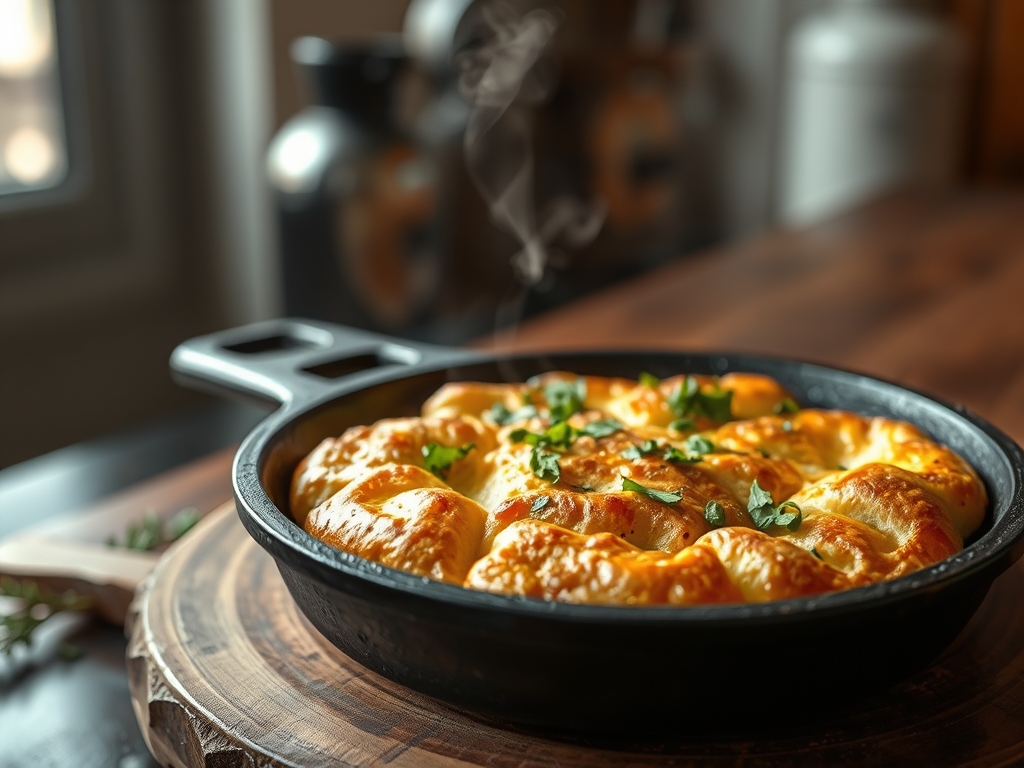
THE VISUAL SPECTRUM
Section C: Thermal & Visual Troubleshooting:
Look at the reference image: notice the "ear" or the raised edge where the score was made. This indicates a successful oven spring. If your loaf is pale and dull, your oven temperature is likely inaccurate; use an oven thermometer to verify. If the bottom is charred but the top is raw, move the rack to a higher position. The "shatter-crisp" crust seen in the photo is achieved through steam. For the first 15 minutes of baking, place a small saucier filled with boiling water on the bottom rack to create a humid environment that keeps the crust supple enough to expand.
THE DEEP DIVE
Macro Nutrition Profile
Per serving (approximately 1/8th of the loaf):
- Calories: 210
- Carbohydrates: 42g
- Protein: 7g
- Fat: 2g
- Fiber: 2g
Dietary Swaps
- Vegan: This recipe is naturally vegan. Ensure your skillet is seasoned with vegetable oil rather than animal fats.
- Gluten-Free: Substitute with a high-quality 1-to-1 GF baking flour and add 15g of psyllium husk powder to provide the necessary "stretch" that gluten usually provides.
- Keto: Replace bread flour with a mix of almond flour, flax meal, and vital wheat gluten (if keto-friendly) or xanthan gum. Note that the texture will be significantly more dense.
Meal Prep & Reheating Science
To maintain the molecular structure of the crust, never store this bread in plastic. Plastic traps moisture, turning the crust into a soggy mess. Store it cut-side down on a wooden board. To reheat, avoid the microwave, which vibrates water molecules and makes the bread rubbery. Instead, use a toaster oven at 350 degrees F for five minutes to re-crisp the exterior while keeping the interior moist.
THE KITCHEN TABLE
Why is my bread sticking to the skillet?
Your seasoning is likely compromised or the skillet was not hot enough. Ensure you have a polymerized oil layer on your iron and always pre-heat the skillet to 450 degrees F before adding the dough and oil.
Can I add herbs or cheese to this?
Absolutely. Fold in rosemary or sharp cheddar during the final "stretch and fold" phase. This allows the inclusions to render their fats and oils directly into the crumb without compromising the primary gluten structure.
My crust is too hard to cut. What happened?
You likely baked it too long or at too low a temperature, causing the moisture to evaporate entirely. High heat and a shorter bake time (25-30 minutes) preserve the internal moisture while snapping the crust into place.
Do I really need a cast iron skillet?
While you can use stainless steel, it lacks the thermal mass of cast iron. The iron provides a more consistent, "bottom-heavy" heat that is essential for that specific rustic, thick-crusted profile we are targeting.

