
Stop treating your vegetables like fragile garden ornaments and start treating them like structural engineering projects. When we discuss Charred Brussels Sprouts, we are not talking about a side dish; we are talking about a high-stakes negotiation between extreme thermal energy and cellular hydration. The goal is a violent, bitter-sweet exterior that shatters against the teeth, followed immediately by a core that remains lush, buttery, and vibrant. Most home cooks fail because they fear the fire. They end up with a pile of sulfurous, grey mush that tastes like a wet wool blanket. To achieve the perfect specimen, you must embrace the Maillard reaction at its most aggressive limit. We are looking for carbonization that borders on the tectonic, balanced by a sharp, acidic glaze that cuts through the dense brassica funk. This is culinary infrastructure at its finest. It requires precision, high-smoke-point lipids, and a total disregard for the smoke detector. If your kitchen does not smell like a controlled burn, you are doing it wrong. Let us audit your process and fix the leaks in your technique.
THE DATA MATRIX
| Metric | Specification |
|---|---|
| Prep Time | 15 Minutes |
| Execution Time | 20 Minutes |
| Yield | 4 Servings |
| Complexity | 4 / 10 |
| Estimated Cost per Serving | $1.75 USD |
THE GATHERS
Ingredient Protocol:
- 680g / 1.5 lbs Fresh Brussels Sprouts (trimmed and halved)
- 45ml / 3 tbsp Extra Virgin Olive Oil or Avocado Oil
- 5g / 1 tsp Diamond Crystal Kosher Salt
- 2g / 0.5 tsp Freshly cracked black pepper
- 30ml / 2 tbsp Aged Balsamic Vinegar or Pomegranate Molasses
- 15ml / 1 tbsp Pure Maple Syrup
- 50g / 0.5 cup Toasted Walnut Halves
- 30g / 0.25 cup Shaved Pecorino Romano
Section A: Ingredient Quality Audit:
The primary failure point in this assembly is the age of the sprout. If the outer leaves are yellowing or the stem end is desiccated, the internal moisture has already evaporated. This results in a sprout that turns to dust rather than a creamy center. Technical Fix: If your sprouts feel light for their size, soak them in an ice-water bath for 20 minutes to rehydrate the cellular walls before drying them thoroughly with a lint-free kitchen towel. Furthermore, if your balsamic vinegar is thin and watery, it will not cling to the charred leaves. Technical Fix: Reduce the vinegar in a small saucier over medium heat by fifty percent before using it to ensure it is sufficiently viscous to coat the vegetable without pooling at the bottom of the bowl.
THE MASTERCLASS
Step-by-Step Execution:
1. The Geometric Calibration
Clean the sprouts and remove any loose, tattered outer leaves. Use a sharp chef knife to slice each sprout vertically through the stem. This ensures the core remains intact during the high-heat phase. Use a bench scraper to transfer the halved sprouts to a large mixing bowl.
Pro Tip: Cutting through the stem is essential for heat distribution. The stem acts as a heat sink, drawing energy into the dense center while the leaves crisp up. Use a digital scale to ensure you have exactly 680g; overcrowding the pan is the fastest way to trigger a steam event that ruins the char.
2. The Lipid Coating
Drizzle the oil over the sprouts and toss vigorously. You want every crevice of the leaves to be coated in a thin, shimmering film. Season with salt and pepper now so the salt can begin to break down the surface tension of the vegetable.
Pro Tip: Use an oil with a high smoke point like avocado oil if you plan to push the oven past 425 degrees Fahrenheit. This prevents the oil from breaking down into acrid, bitter compounds before the Maillard reaction is complete.
3. The Thermal Impact
Preheat a heavy-rimmed baking sheet in a 425 degree Fahrenheit oven. Once the steel is screaming hot, pull it out and quickly arrange the sprouts cut-side down. You should hear an immediate, aggressive sizzle. This is the sound of moisture leaving the surface to make room for browning.
Pro Tip: Using a preheated pan creates an immediate sear, similar to a commercial flat-top grill. This "thermal shock" locks in the interior moisture while the exterior begins to render its natural sugars into a dark crust.
4. The Agitation Phase
Roast for 15 to 20 minutes without touching them. Resist the urge to stir. At the 15-minute mark, use a metal spatula to flip one sprout. If it looks like dark mahogany, toss the entire tray to let the rounded sides catch some heat for the final 5 minutes.
Pro Tip: Constant stirring is the enemy of the char. You need sustained contact with the hot metal to achieve that deep, piquant bitterness that characterizes a professional-grade sprout.
5. The Emulsion Glaze
While the sprouts finish, whisk your balsamic and maple syrup in a small bowl. Once the sprouts are out of the oven and still sizzling, pour the mixture over them directly on the pan or in a bowl. The residual heat will infuse the glaze into the leaves and slightly deglaze the caramelized bits stuck to the pan.
Pro Tip: This is a flash-reduction. The heat of the vegetable causes the glaze to thicken instantly, creating a glossy, professional finish that does not feel greasy.
Section B: Prep & Timing Fault-Lines:
The most common timing error is "The Cold Start." Placing sprouts on a cold pan in a cold oven results in a slow bake that leaches moisture, leaving you with a rubbery texture. Another fault-line is the "Post-Roast Delay." If you let the sprouts sit on the pan for ten minutes before serving, the carry-over heat will continue to cook the interior, turning the vibrant green to a dull khaki. Technical Fix: Move the sprouts to a room-temperature serving bowl immediately after glazing to halt the cooking process and preserve the structural integrity of the "bite."
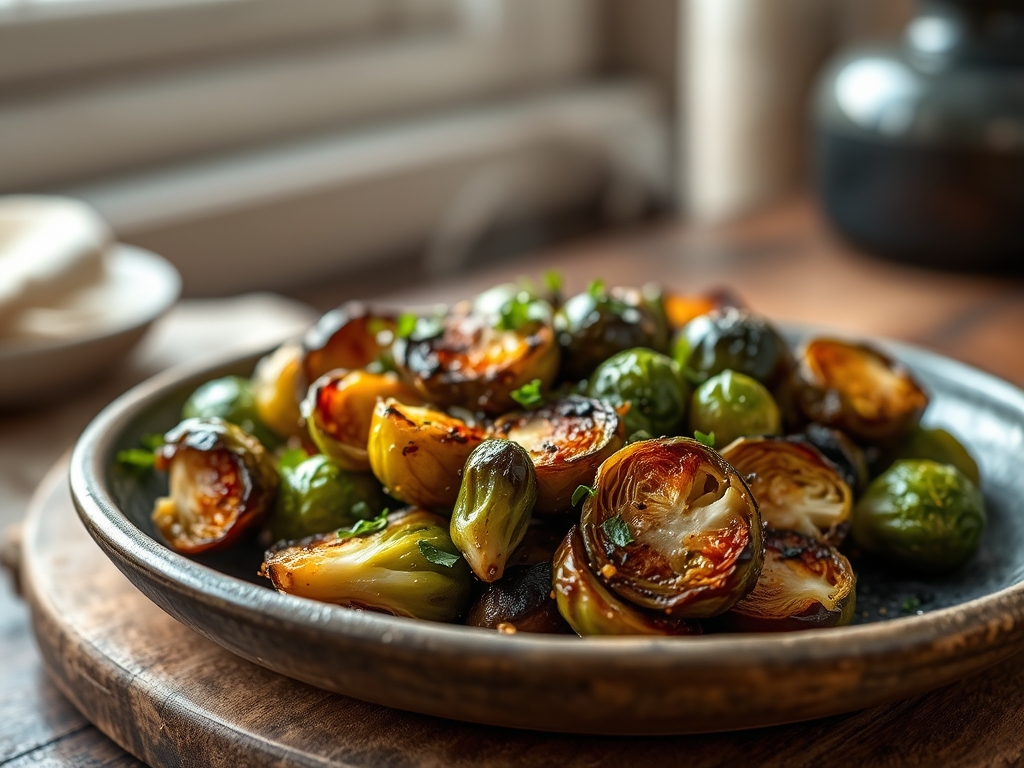
THE VISUAL SPECTRUM
Section C: Thermal & Visual Troubleshooting:
Referencing the Masterclass photo, you should see a distinct contrast between the blackened edges and the bright, emerald-green interiors. If your sprouts look uniform in color, you likely lacked sufficient heat. If the leaves are burnt but the centers are hard, your oven temperature was too high or your sprouts were too large. Technical Fix: For oversized sprouts, par-cook them in the microwave for 2 minutes before roasting to soften the core. If the color is dull, you likely forgot the acid. A final squeeze of fresh lemon juice or a splash of vinegar will aerate the heavy flavors and brighten the visual green of the vegetable.
THE DEEP DIVE
Macro Nutrition Profile:
A standard serving provides approximately 180 calories, 12g of healthy fats (primarily from the oil and walnuts), 15g of carbohydrates, and 6g of fiber. They are a powerhouse of Vitamin K and Vitamin C, making them an excellent choice for metabolic health.
Dietary Swaps:
- Vegan: This recipe is inherently vegan; ensure your maple syrup is pure.
- Keto: Omit the maple syrup and balsamic glaze. Use a splash of apple cider vinegar and a pinch of erythritol if a sweetener is desired. Replace walnuts with pecans for a lower carb count.
- GF: Naturally gluten-free. Ensure your toasted nuts were not processed in a facility with wheat.
Meal Prep & Reheating Science:
To maintain the molecular structure when reheating, avoid the microwave at all costs. The microwave vibrates water molecules, which will turn the crisp exterior into a soggy mess. Instead, use an air fryer at 375 degrees Fahrenheit for 4 minutes or a dry skillet over medium-high heat. This re-crisps the exterior lipids while gently warming the core.
THE KITCHEN TABLE
Why are my sprouts bitter instead of sweet?
Bitterness usually stems from undercooking the core or using old sprouts. Ensure you achieve a deep brown char; this caramelizes the natural sugars, which chemically offsets the bitter glucosinolates inherent in brassicas.
Can I use frozen Brussels sprouts for this?
Negative. Frozen sprouts have compromised cellular walls due to ice crystallization. When thawed, they release too much moisture, making a high-heat char impossible. Stick to fresh for the required structural integrity.
What is the best way to get an even char?
Placement is everything. You must place every single sprout cut-side down. This maximizes the surface area in contact with the heat source, ensuring a uniform, mahogany crust across the entire batch.
How do I prevent the leaves from burning before the centers cook?
If the leaves are carbonizing too quickly, your oven rack is likely too high. Move the tray to the bottom third of the oven to utilize more conductive heat from the bottom element rather than intense radiant heat from the top.

