
Listen up. We are not merely baking; we are conducting a high-stakes structural audit of gluten and lipids. Forget the sterile, machine-stamped perfection of a grocery store freezer aisle. We are diving into the gritty, glorious world of the Hand Folded Pie Crust. This is where mechanical stress meets culinary grace. When you press cold, high-fat butter into stone-ground flour, you are creating a laminated fortress designed to shatter upon impact with the human incisor. The smell alone is a chemical warfare of toasted lactose and caramelized wheat. We want jagged edges. We want rustic folds that look like they were forged in a blacksmith's shop rather than a laboratory. This is about the tactile feedback of the dough against your palms and the frantic race against room temperature. If your butter melts before it hits the oven, you have failed the structural integrity test. We are looking for that specific, golden-hued shatter that signals a perfect moisture-to-fat ratio. Prepare your station; we are about to render some serious flavor.
THE DATA MATRIX
| Metric | Specification |
|---|---|
| Prep Time | 20 Minutes |
| Execution Time | 60 Minutes (plus chilling) |
| Yield | 2 Standard Crusts |
| Complexity (1-10) | 7 |
| Estimated Cost per Serving | $0.45 |
THE GATHERS
Ingredient Protocol:
- 375g / 3 cups All-Purpose Flour (unbleached)
- 225g / 1 cup Unsalted Butter (frozen and cubed)
- 5g / 1 tsp Fine Sea Salt
- 15g / 1 tbsp Granulated Sugar
- 120ml / 0.5 cup Ice Water (filtered)
- 5ml / 1 tsp Apple Cider Vinegar
Section A: Ingredient Quality Audit:
If your flour has a protein content exceeding 11 percent, your Hand Folded Pie Crust will likely transition from "flaky" to "leathery." High protein means aggressive gluten development. To fix this, replace 10 percent of your flour weight with cornstarch to aerate the mixture and soften the crumb. If your butter smells like the inside of a plastic container, it has oxidized. Use high-fat European-style butter with at least 82 percent butterfat for a superior render. If your water is not "bone-chilling" cold, the butter will emulsify into the flour rather than remaining in discrete pockets. This results in a mealy texture rather than a laminated one. Always chill your mixing bowl in the freezer for ten minutes before starting the protocol.
THE MASTERCLASS
Step 1: The Dry Integration
Whisk your flour, salt, and sugar in a chilled stainless steel bowl. Ensure the distribution is perfectly homogenous before introducing the fat. Use a digital scale for this; volume measurements are for amateurs who enjoy inconsistent results.
Pro Tip: Use a whisk to aerate the flour. This introduces micro-pockets of oxygen that help the fat distribute more evenly during the initial "cut-in" phase.
Step 2: The Fat Fracture
Drop your frozen butter cubes into the flour. Use a bench scraper or a pastry blender to cut the fat into the dry goods. You are looking for pieces ranging from the size of a pea to the size of a walnut.
Pro Tip: The science here is simple; large chunks of butter create steam vents. As the water in the butter evaporates in the oven, it lifts the layers of flour, creating the "lift" seen in professional pastry.
Step 3: Hydration and Acidification
Combine your ice water and vinegar. Drizzle the liquid over the flour mixture one tablespoon at a time. Toss the mixture with a fork or your fingers until the dough just begins to hold together when squeezed. It should look "shaggy" and slightly dry.
Pro Tip: The vinegar is a secret weapon. It acts as a dough conditioner that inhibits gluten bonds from becoming too tight, ensuring a tender bite while adding a faint, piquant brightness to the flavor profile.
Step 4: The Mechanical Fold
Turn the shaggy mass onto a cold marble slab or clean counter. Use your bench scraper to fold the dough over itself three or four times. This is the "Hand Folded" part of the Hand Folded Pie Crust. Do not overwork it.
Pro Tip: This technique is a simplified version of puff pastry lamination. Each fold creates layers of butter and flour that will translate into distinct, visible flakes after the bake.
Step 5: The Thermal Reset
Divide the dough, wrap it tightly in plastic, and flatten it into discs. Refrigerate for at least two hours, though overnight is preferable. This allows the flour to fully hydrate and the gluten to relax after the mechanical stress of folding.
Pro Tip: Cold dough is non-negotiable. If the dough exceeds 65 degrees Fahrenheit during rolling, the butter will melt into the flour, destroying your structural integrity.
Section B: Prep & Timing Fault-Lines:
The biggest human error is the "Warm Palm Syndrome." If you have naturally warm hands, minimize direct contact with the dough. Use a bench scraper as much as possible to move the mass. Another timing error is rushing the rest period. If you roll out the dough immediately after mixing, the gluten will snap back like a rubber band, causing the crust to shrink significantly in the oven. If the dough feels too stiff to roll, let it sit at room temperature for exactly five minutes; no more, no less.
THE VISUAL SPECTRUM
Section C: Thermal & Visual Troubleshooting:
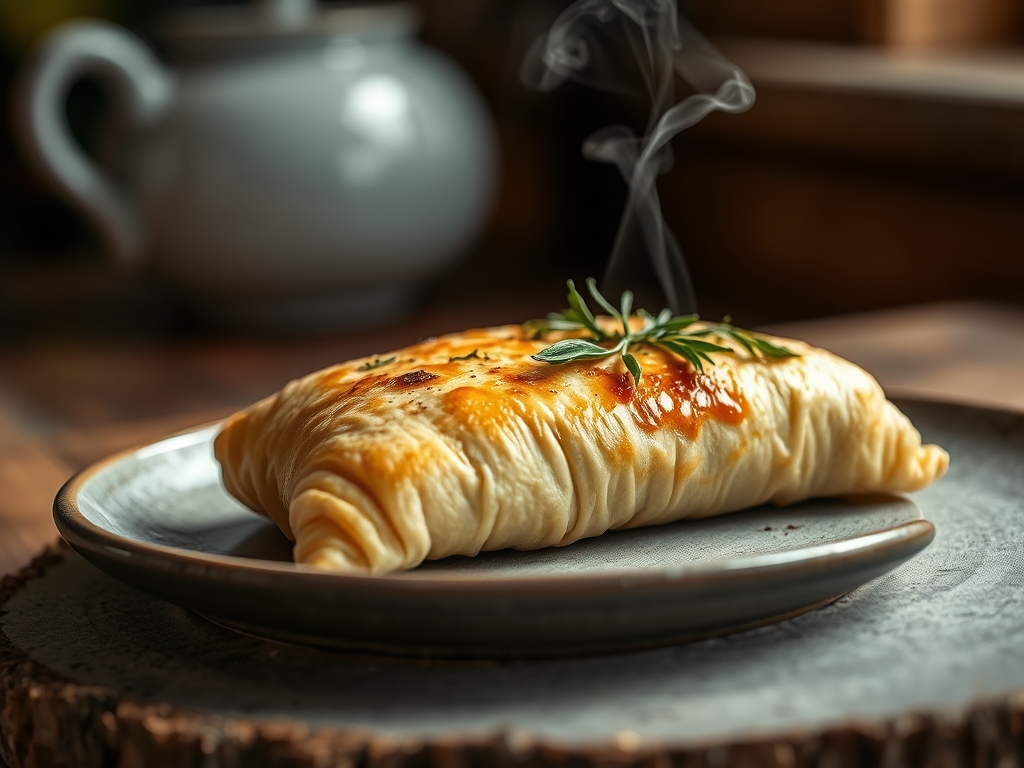
Referencing the Masterclass photo, you should see distinct "shingled" edges that are dark golden brown. If your crust is pale and translucent, it is underbaked and likely "soggy bottomed." Increase your oven floor temperature. If the edges are burning while the center is raw, use a foil shield. A dull, matte finish indicates you forgot the egg wash. For a professional sheen, brush the edges with a mixture of egg yolk and heavy cream before baking. This promotes the Maillard reaction, giving you that deep, viscous golden glow. If the crust looks "bubbly" in a greasy way, your butter chunks were too large or too warm when they entered the oven.
THE DEEP DIVE
Macro Nutrition Profile:
Per serving (1/8th of a double crust), expect approximately 280 calories, 18g of fat, 24g of carbohydrates, and 3g of protein. This is a high-density energy source designed for flavor, not a calorie deficit.
Dietary Swaps:
- Vegan: Substitute the butter with frozen, cubed coconut oil or a high-quality vegan butter stick with low water content.
- Keto: This is difficult, but a 50/50 mix of almond flour and coconut flour with xanthan gum can mimic the structure, though you will lose the lamination.
- GF: Use a 1-to-1 gluten-free flour blend that contains rice flour and potato starch. Add an extra egg yolk to provide the structural "glue" that gluten usually provides.
Meal Prep & Reheating Science:
You can freeze raw dough discs for up to three months. To reheat a pre-baked pie, avoid the microwave at all costs. The microwave vibrates water molecules, which turns your crisp crust into a soggy, viscous mess. Use a toaster oven at 350 degrees Fahrenheit for 10 minutes to re-crisp the fats and restore the molecular snap of the crust.
THE KITCHEN TABLE
Why is my crust shrinking in the pan?
You likely overstretched the dough while fitting it into the dish. Gravity and heat cause the gluten to retract. Always drape the dough into the pan and gently "drop" it into the corners without pulling.
Can I use a food processor for this?
You can, but you risk over-processing the fat. Pulse sparingly. For a true Hand Folded Pie Crust, the manual method provides superior control over the size of the butter chunks and prevents gluten over-development.
What does the salt actually do?
Beyond flavor, salt strengthens the gluten structure and controls the rate of browning. Without salt, the crust will taste flat and the chemical reactions that create that "toasted" aroma will be muted.
How do I prevent a soggy bottom?
Blind bake the crust using pie weights or dried beans. This sets the structure before you add any wet fillings. You can also brush the bottom with a thin layer of egg white to create a waterproof barrier.

