
The scent of atomized beef tallow is the only alarm clock a true professional needs. We are not merely flipping patties; we are conducting a high-stakes thermal audit on a four-inch disc of ground chuck. The goal is a total structural collapse of the meat fibers against a scorching metal surface to achieve the ultimate Cast Iron Burger. This is where the Maillard reaction ceases to be a chemical theory and becomes a tactile reality. You are looking for that jagged, lace-like edge that shatters like glass under the tooth. If your kitchen does not smell like a localized industrial fire, you are likely doing it wrong. We demand a surface area maximization that forces every protein strand to surrender to the heat. This is about the violent transition from raw red to a deep, mahogany crust. We are engineering a contrast between the pressurized, crispy exterior and the molten, juice-heavy interior. Grab your heavy-duty spatula and prepare for a sensory assault where the sound of the sear is the only metric that matters.
THE DATA MATRIX
| Metric | Specification |
|---|---|
| Prep Time | 15 Minutes |
| Execution Time | 6 Minutes |
| Yield | 4 Servings |
| Complexity (1-10) | 4 |
| Estimated Cost per Serving | $4.50 |
THE GATHERS
Ingredient Protocol:
- 680g / 1.5 lbs High-fat Ground Chuck (80/20 ratio)
- 4 Large Brioche Buns
- 8 Slices Sharp American Cheese
- 60ml / 4 tbsp Unsalted Butter (Softened)
- 15g / 1 tbsp Kosher Salt
- 10g / 2 tsp Coarse Black Pepper
- 1 Large White Onion (Thinly shaved)
- 60ml / 1/4 cup Neutral Oil (High smoke point)
Section A: Ingredient Quality Audit:
The primary failure point in a Cast Iron Burger is the fat-to-lean ratio. If you use 90/10 lean beef, the patty will lack the viscous rendering required to fry the meat in its own juices. The fix: If you are stuck with lean meat, grate 30g of frozen butter into the mix to artificially boost the lipid content. Another common error is using cold buns. A cold bun acts as a heat sink, sucking the thermal energy out of the meat. Always toast your buns until they are golden and the crumb is slightly aerated to create a moisture barrier. Finally, ensure your salt is coarse. Fine table salt dissolves too quickly and can draw out moisture prematurely, turning your sear into a steam.
THE MASTERCLASS
1. Thermal Priming and Portioning
Divide your beef into four 170g / 6oz spheres. Do not pack them tightly; you want a loose matrix of meat. Place your cast iron skillet over high heat until it reaches 230C / 450F. Use an infrared thermometer to verify the surface temperature across the entire radius.
Pro Tip: Use a digital scale to ensure every portion is identical. This ensures uniform cooking times across the batch, preventing one patty from overcooking while another remains under-rendered.
2. The Initial Impact and Compression
Place the meat spheres onto the dry, hot surface. Immediately use a heavy, flat-bottomed press or a sturdy spatula reinforced by a bench scraper to crush the meat into a thin, wide disc. Apply maximum downward pressure for at least 10 seconds to lock the meat against the iron.
Pro Tip: The science here is "contact patch" optimization. By applying extreme pressure early, you force the proteins into direct contact with the metal, accelerating the Maillard reaction before the internal steam can push the meat away from the heat source.
3. Seasoning and Onion Integration
While the first side is searing, aggressively season the upward-facing side with salt and pepper. Press a handful of thinly shaved onions directly into the raw meat. This allows the onions to infuse their moisture into the beef while the bottom side develops a crust.
Pro Tip: Use a saucier or a small metal bowl to cover the patty for 30 seconds if you want to accelerate the onion softening. This creates a localized steam chamber without compromising the bottom crust.
4. The Critical Scraping Flip
Once the edges are dark brown and look brittle, use your bench scraper to get underneath the crust. You must scrape with enough force to peel the caramelized layer off the iron without tearing it. Flip the patty so the onions are now against the hot metal.
Pro Tip: A thin, flexible offset spatula is the professional tool of choice here. It allows you to maintain a low angle of attack, ensuring you capture 100 percent of the "fond" (the browned bits) rather than leaving them stuck to the pan.
5. Cheese Application and Final Melt
Immediately place two slices of cheese on the seared side. The residual heat will begin to render the cheese into a molten state. Add a teaspoon of water to the pan and cover briefly to create a burst of steam that perfectly melts the cheese.
Pro Tip: This is where the emulsification of the cheese occurs. The steam helps the proteins in the cheese relax and flow, coating every jagged peak of the beef crust for a superior mouthfeel.
Section B: Prep & Timing Fault-Lines:
Timing is the silent killer of the perfect burger. If you smash the meat too late in the process (after the fat has already started to liquefy), you will squeeze out the juices without achieving the crust. This results in a dry, grey patty. Always smash within the first 20 seconds of contact. Furthermore, if your pan is not hot enough, the meat will "stew" in its own juices. If you see grey liquid pooling around the patty, your thermal mass is too low. Remove the meat, clean the pan, and wait for the oil to reach a shimmering, hazy state before re-attempting.
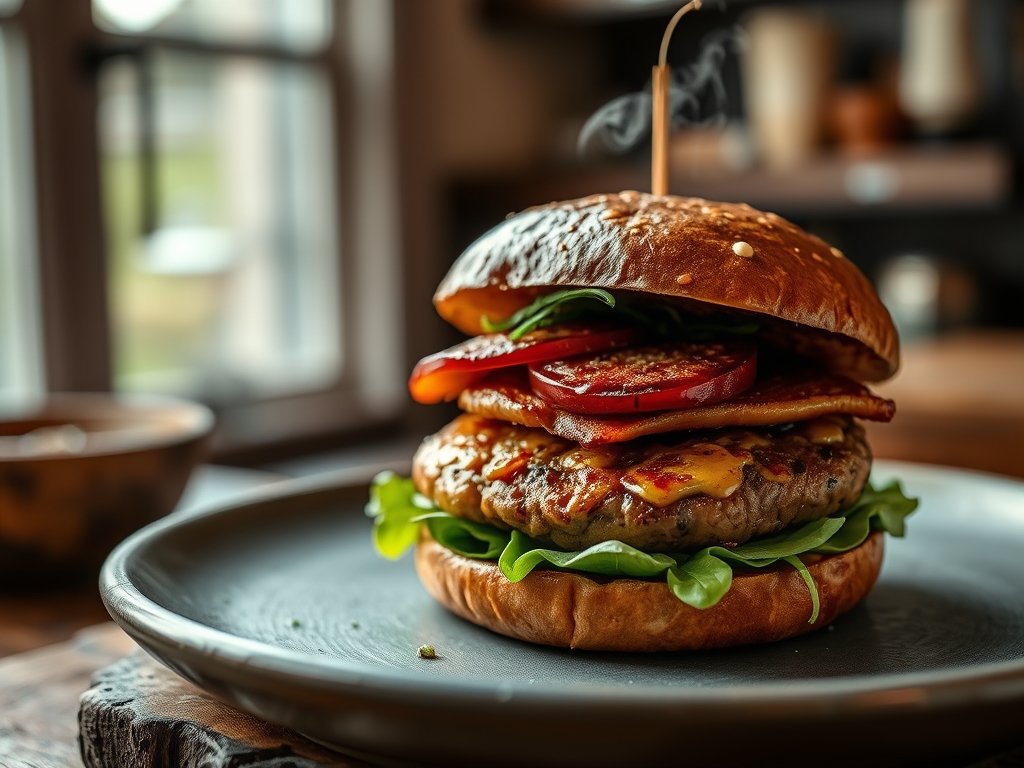
THE VISUAL SPECTRUM
Section C: Thermal & Visual Troubleshooting:
Look closely at the Masterclass photo. You should see a "lace" effect at the perimeter of the patty. This is a sign of successful fat rendering and high-pressure smashing. If your patty looks smooth and uniform, you didn't press hard enough. If the cheese looks oily and separated, you overheated it; next time, pull the pan off the burner the moment the cheese starts to droop. A dull, greyish-brown color indicates a lack of salt or insufficient heat. The ideal visual cue is a deep, variegated mahogany with "cratered" spots where the fat bubbles have burst and fried the surrounding protein. If the onions are charred black rather than translucent and golden, your heat is too high or your onions were sliced too thick.
THE DEEP DIVE
Macro Nutrition Profile:
A single serving (one double-patty burger) typically contains 780 calories. This breaks down into approximately 45g of protein, 52g of fat, and 34g of carbohydrates. The high fat content is essential for the texture but should be noted by those on strict caloric restrictions.
Dietary Swaps:
- Vegan: Use a high-fat plant-based "bleeding" burger meat. Substitute the butter for a coconut-oil based spread and use vegan "cheddar" slices.
- Keto: Replace the brioche bun with a large butter-lettuce wrap or serve the patties over a bed of dressed arugula.
- GF: Ensure the bun is a certified gluten-free brioche alternative and check that your cheese does not contain anti-caking starches.
Meal Prep & Reheating Science:
To maintain the molecular structure, do not reheat in a microwave. The microwave agitates water molecules, turning the crust soggy and the beef rubbery. Instead, use a toaster oven at 175C / 350F for 5 minutes. This dry heat helps re-crisp the exterior lipids while gently warming the core.
THE KITCHEN TABLE
Why is my burger sticking to the spatula when I smash it?
You need a barrier. Place a small square of parchment paper between the meat and the spatula before you press. This prevents the raw proteins from bonding to the cool metal of your tool.
Can I use a non-stick pan for this?
Technically yes, but practically no. Non-stick coatings are not designed for the extreme dry heat required for a proper sear. You risk damaging the pan and you will never achieve the same level of crust.
Should I season the meat before forming the balls?
Never. Salting the meat early dissolves the protein myosin, which turns the texture from "crumbly burger" to "dense sausage." Only season the exterior of the patty once it hits the hot iron.
What is the best oil to use?
Grapeseed or Avocado oil. Both have high smoke points (above 200C / 400F), meaning they won't break down into bitter, acrid compounds during the high-heat searing process. Avoid extra virgin olive oil.
How do I get those thin onions?
Use a mandoline set to the thinnest possible gauge. The onions should be translucent. This allows them to cook through in the 60 seconds they are in contact with the pan.

