
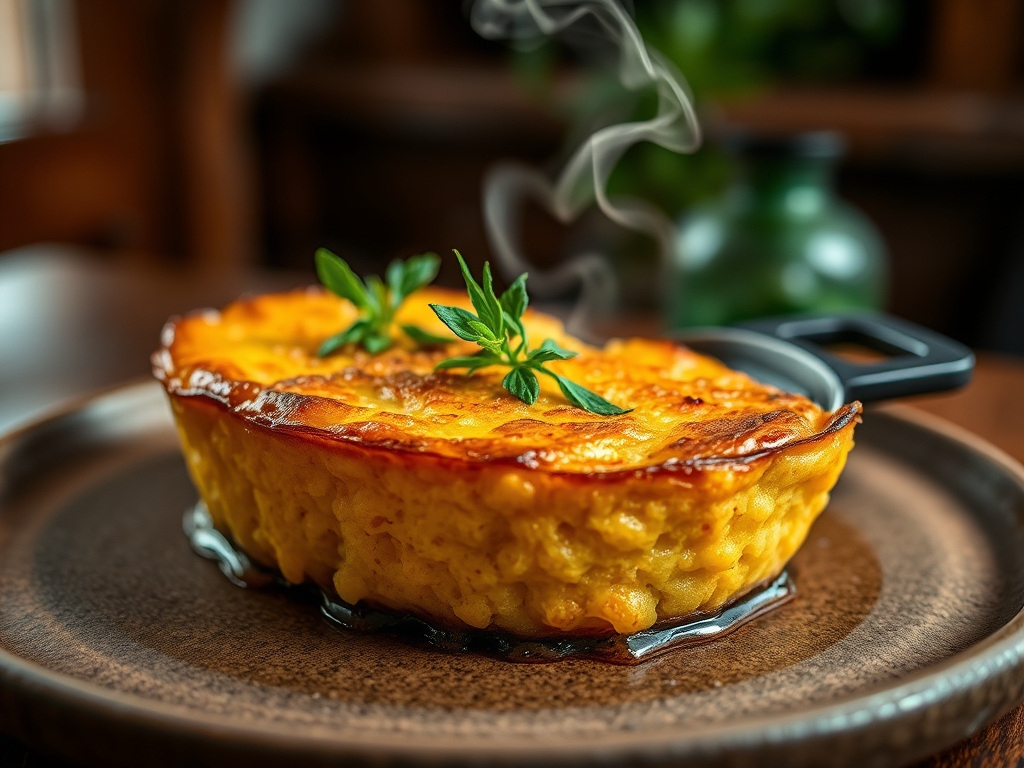
Listen up, kitchen operatives. We are not here to bake a polite, crumbly side dish for a church social. We are here to conduct a high-stakes thermal extraction. The objective is simple but the execution is often botched: we are chasing the legendary Skillet Cornbread Char. This is the structural foundation of Southern culinary architecture. It is that dark, mahogany perimeter where the batter meets the screaming-hot iron and undergoes a violent phase change. When the cornmeal hits that rendered fat, we are looking for a sizzle that sounds like a standing ovation. We want a crust so structurally sound it could support a bridge, yet an interior that remains a moist, aerated cloud of golden crumb. This is about the physics of heat transfer and the chemistry of the Maillard reaction. If you are looking for a soft, pale muffin, you are in the wrong briefing room. We are here to weaponize cast iron and butter to create a textural contrast that defies the laws of standard baking.
THE DATA MATRIX
| Metric | Specification |
|---|---|
| Prep Time | 15 Minutes |
| Execution Time | 25 Minutes |
| Yield | 8 Tactical Wedges |
| Complexity (1-10) | 4 (Technique Sensitive) |
| Estimated Cost per Serving | $0.65 USD |
THE GATHERS
Ingredient Protocol:
- Yellow Stone-Ground Cornmeal: 300g / 2 cups
- All-Purpose Flour: 125g / 1 cup
- Granulated Sugar: 50g / 0.25 cup
- Baking Powder: 15g / 1 tablespoon
- Baking Soda: 5g / 1 teaspoon
- Fine Sea Salt: 6g / 1.25 teaspoons
- Full-Fat Buttermilk: 355ml / 1.5 cups
- Large Eggs (Room Temp): 2 units
- Unsalted Butter (Melted): 113g / 0.5 cup
- Bacon Grease or Ghee (For the Skillet): 30ml / 2 tablespoons
Section A: Ingredient Quality Audit:
If your cornmeal is "instant" or finely bolted like talcum powder, your structural integrity will fail. You need stone-ground meal to provide the necessary grit for a superior Skillet Cornbread Char. If your buttermilk lacks the required viscous consistency, the batter will be too thin; compensate by adding a tablespoon of Greek yogurt to increase the acidity and thickness. Ensure your leavening agents are not expired. To test, drop a pinch of baking powder into hot water; if it doesn't aggressively aerate and bubble, discard it. Sub-par fats will smoke too early. Use high-smoke-point fats like ghee or rendered bacon fat to ensure the iron can reach the necessary thermal threshold without acrid off-flavors.
THE MASTERCLASS
1. Thermal Priming of the Iron
Place a 10-inch cast-iron skillet into the oven and preheat to 220C / 425F. The skillet must be heat-soaked for at least 20 minutes. This is not negotiable. We are turning the iron into a thermal battery that will instantly render the exterior of the batter upon contact.
Pro Tip: Use an infrared thermometer to verify the skillet surface has reached at least 210C before adding the fat. A cold pan is the primary cause of a pale, flaccid crust.
2. The Dry Phase Integration
In a large stainless steel mixing bowl, whisk together the cornmeal, flour, sugar, baking powder, baking soda, and salt. Ensure the mixture is homogenous and free of clumps. Use a digital scale for these measurements; volumetric cups are for amateurs and lead to inconsistent hydration levels.
Pro Tip: Sifting the dry ingredients through a fine-mesh sieve will help aerate the mixture, leading to a lighter crumb that contrasts perfectly with the heavy exterior char.
3. Emulsifying the Wet Matrix
In a separate saucier or glass bowl, whisk the buttermilk, eggs, and melted butter until fully emulsified. The buttermilk provides the acid necessary to react with the baking soda, creating the carbon dioxide bubbles required for lift.
Pro Tip: Ensure your eggs are at room temperature. Cold eggs will cause the melted butter to seize into small waxy clumps, ruining the viscous harmony of the batter.
4. The High-Velocity Merge
Make a well in the center of the dry ingredients and pour in the wet matrix. Use a silicone spatula or a bench scraper to fold the ingredients together until just combined. Do not overmix. Overworking the batter develops gluten, which turns your cornbread into a tough, rubbery brick.
Pro Tip: The batter should look slightly lumpy. Small pockets of dry flour are acceptable and will disappear during the high-heat expansion in the oven.
5. The Sizzle Deployment
Carefully remove the glowing-hot skillet from the oven. Drop in your bacon grease or ghee. It should smoke slightly and liquefy instantly. Swirl to coat the bottom and the sides. Immediately pour the batter into the center of the pan. You should hear an aggressive, sustained sizzle.
Pro Tip: This "cold batter on hot iron" technique is what guarantees the Skillet Cornbread Char. The immediate sear prevents the batter from sticking and begins the Maillard browning before the pan even returns to the oven.
6. The Final Thermal Blast
Return the skillet to the oven and bake for 20 to 25 minutes. The center should be firm to the touch and a toothpick should come out clean. The edges should be dark brown and beginning to pull away from the sides of the iron.
Pro Tip: During the last 2 minutes of baking, brush the top with a bit of honey-infused butter to infuse a sweet counterpoint to the salty, charred exterior.
Section B: Prep & Timing Fault-Lines:
The most common failure is a timing gap between mixing the batter and hitting the pan. Once the buttermilk hits the leavening agents, the clock is ticking. If you let the batter sit on the counter for ten minutes while the oven finishes preheating, you lose your lift. Another fault-line is temperature fluctuation; if you open the oven door every five minutes to check progress, you drop the ambient heat and stall the crust formation. Trust the timer.
THE VISUAL SPECTRUM
Section C: Thermal & Visual Troubleshooting:
Observe the Masterclass photo. Note the deep, variegated bronze of the edges; that is the Skillet Cornbread Char in its peak form. If your bread is uniform in color, you didn't get the pan hot enough. If the top is cracked like a desert floor, your oven is too dry; place a small ramekin of water on the bottom rack to provide a touch of steam. If the bottom is burnt but the top is pale, move your rack to the upper third of the oven for the next deployment. Dull, matte surfaces indicate a lack of fat in the pan; the fat should fry the edges, not just grease them.
THE DEEP DIVE
Macro Nutrition Profile:
A standard tactical wedge (1/8th of the recipe) yields approximately 280 calories, 34g carbohydrates, 14g fat, and 6g protein. This is fuel for high-output operations.
Dietary Swaps:
- Vegan: Substitute buttermilk with soy milk plus 1 tablespoon of apple cider vinegar. Use coconut oil or vegan butter for the fat.
- Keto: Replace cornmeal and flour with almond flour and a dash of corn extract for flavor. Use erythritol as the sweetener.
- GF: Utilize a high-quality 1-to-1 gluten-free flour blend and certified GF cornmeal.
Meal Prep & Reheating Science:
To maintain the molecular structure and the Skillet Cornbread Char, never use a microwave. Microwaves excite water molecules, turning the crust into a soggy mess. To reheat, place wedges in a dry skillet over medium heat for 3 minutes per side. This re-crisps the exterior fats and restores the original textural integrity.
THE KITCHEN TABLE
Why is my cornbread crumbly?
You likely overmixed the batter or used too much cornmeal relative to flour. The flour provides the gluten "glue" that holds the crumb together. Ensure your measurements are precise using a digital scale.
Can I use a cake pan?
Negative. A cake pan lacks the thermal mass of cast iron. You will achieve zero Skillet Cornbread Char and the result will be a pale, uninspired bread. Stick to the iron protocol.
Why did my crust stick to the pan?
The skillet was not hot enough or was insufficiently seasoned. The fat must be shimmering and near its smoke point before the batter is introduced to create a steam barrier that prevents sticking.
Is the sugar necessary?
Technically, no; but sugar aids in the Maillard reaction. It provides the fuel for the browning process, resulting in a more complex, piquant flavor profile and a deeper visual char on the perimeter.

