
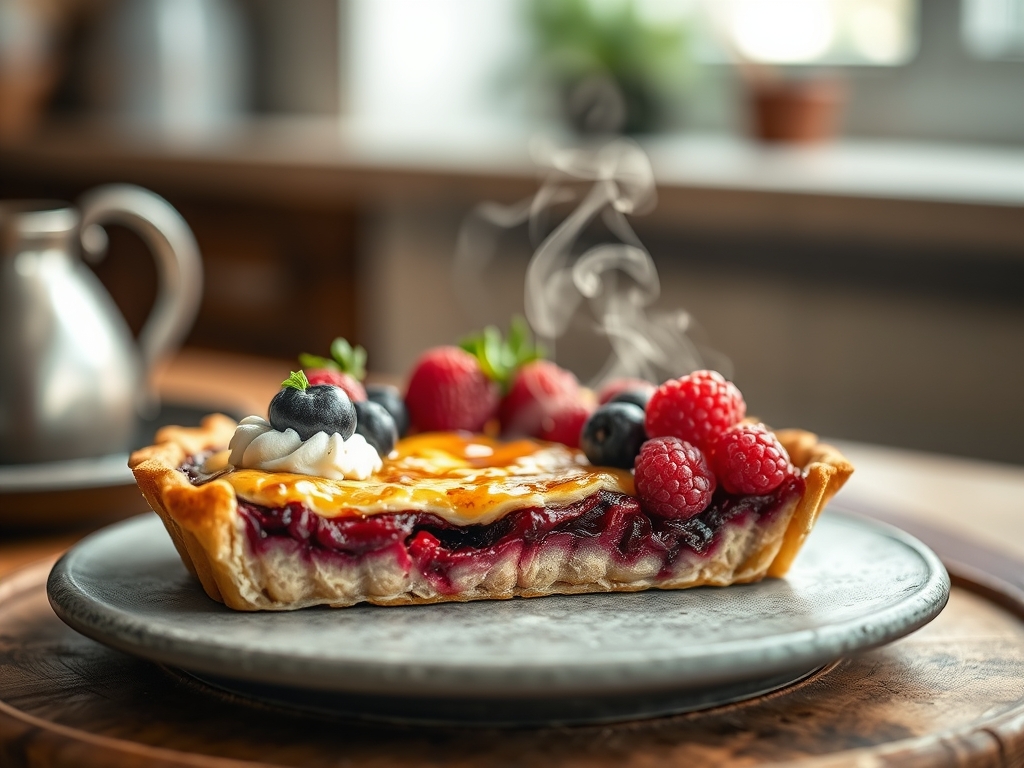
Listen closely because your kitchen is currently a crime scene of untapped potential. We are here to talk about the structural integrity of the Rustic Berry Tart; a dessert that masquerades as a casual, farmhouse afterthought but actually demands the precision of a Swiss watchmaker. If you have ever pulled a tray from the oven only to find a soggy, purple swamp where a crisp perimeter should be, you have failed the audit. We are hunting for that perfect intersection of shattered shortcrust and viscous, bubbling fruit nectar. The "rustic" label is not an excuse for laziness; it is a design choice that requires high-level heat management and moisture control. We are looking for a crust that shatters like glass and a filling that holds its shape without the chalky interference of over-thickening. This is about the Maillard reaction meeting pectin-driven structural stability. If you are ready to stop making "puddings in a shell" and start engineering a masterpiece of scorched pastry perimeters, then grab your digital scale. The audit begins now.
THE DATA MATRIX
| Metric | Specification |
|---|---|
| Prep Time | 25 minutes |
| Execution Time | 45 minutes |
| Yield | 8 Servings |
| Complexity (1-10) | 4 |
| Estimated Cost per Serving | $1.85 |
THE GATHERS
Ingredient Protocol:
The Structural Base (Pastry):
- 315g / 2.5 cups All-purpose flour (unbleached)
- 225g / 1 cup Unsalted butter (chilled to 4 degrees Celsius)
- 15g / 1 tbsp Granulated sugar
- 5g / 1 tsp Fine sea salt
- 60ml to 120ml / 0.25 to 0.5 cup Ice water (measured precisely)
The Viscous Core (Filling):
- 680g / 4 cups Mixed fresh berries (blackberries, raspberries, blueberries)
- 100g / 0.5 cup Granulated sugar
- 30g / 4 tbsp Cornstarch (the stabilizing agent)
- 15ml / 1 tbsp Lemon juice (to brighten the piquant notes)
- 2g / 0.5 tsp Lemon zest
The Finishing Glaze:
- 1 Large egg (beaten for the wash)
- 15g / 1 tbsp Demerara sugar (for textural crunch)
Section A: Ingredient Quality Audit:
If your berries are weeping juice before they even hit the bowl, your osmotic pressure is off. Frozen berries are a common culprit for "soggy bottom syndrome" because their cell walls have ruptured; if using frozen, do not thaw them. Instead, toss them in an extra 5g of cornstarch to absorb the immediate liquid release. If your butter is "waxy" or has a low butterfat content (anything under 80 percent), your crust will lack the necessary flakiness. The fix? Use European-style butter with 82 to 84 percent butterfat. This ensures the water content is low enough to prevent premature gluten development. Finally, if your flour smells "dusty," it is oxidized. Use fresh, protein-stable flour to ensure the pastry can support the weight of the fruit.
THE MASTERCLASS
Step 1: Cold Chain Maintenance
Begin by cutting your chilled butter into 1cm cubes. Using a bench scraper, work the butter into the flour, sugar, and salt until the mixture resembles coarse sand with some pea-sized lumps remaining. Do not overwork the dough with your hands; the heat from your palms will melt the fats and ruin the lamination.
Pro Tip: Keeping the butter in a solid state creates steam pockets during the bake. This is the mechanical leavening process that produces a flaky rather than crumbly texture. Use a digital scale to ensure your flour-to-fat ratio is chemically balanced.
Step 2: Hydration Control
Slowly drizzle the ice water into the mixture while tossing with a fork. Stop the moment the dough holds together when squeezed. Wrap the mass in plastic and refrigerate for at least 60 minutes. This allows the starch granules to infuse with moisture and the gluten to relax.
Pro Tip: If you skip the rest period, the dough will shrink in the oven like a cheap suit. A relaxed gluten network is the only way to achieve a tender "short" crumb.
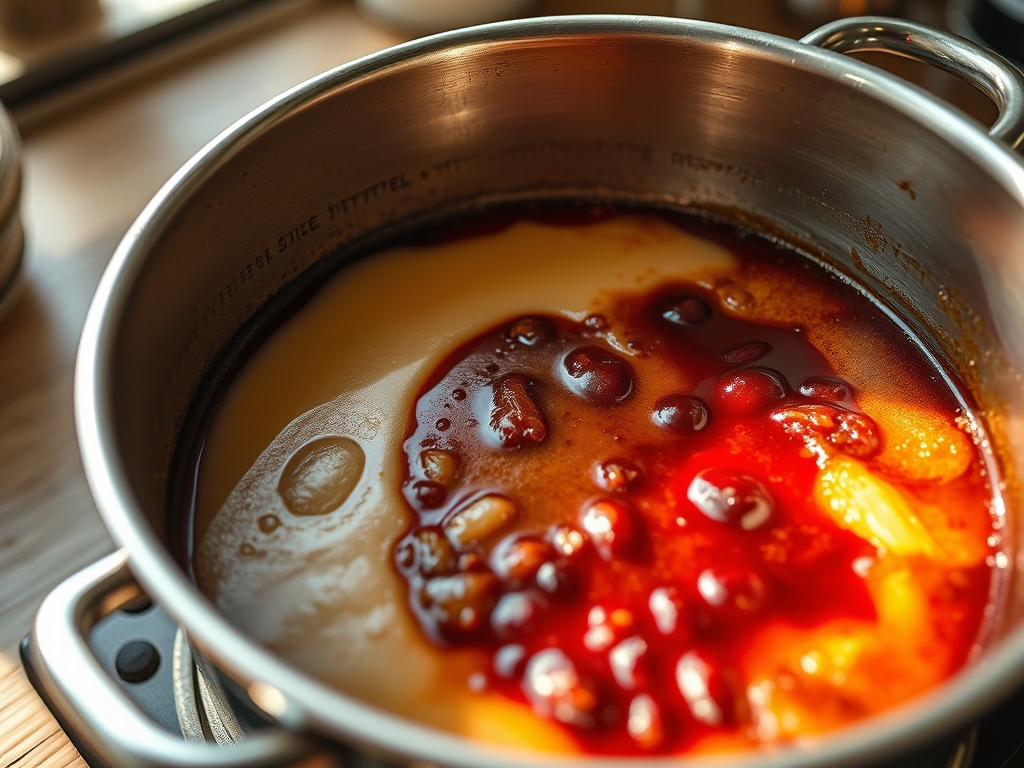
Step 3: The Fruit Matrix
In a large stainless steel bowl, gently toss the berries with the sugar, cornstarch, lemon juice, and zest. You want to coat the fruit without crushing the delicate skins. The cornstarch must be evenly distributed to prevent "clumping" during the gelatinization phase.
Pro Tip: The lemon juice provides the acid necessary to balance the sugar and activate the natural pectin in the berries. This ensures the filling becomes viscous rather than watery.
Step 4: Architectural Assembly
Roll the dough on a lightly floured surface into a 30cm circle. Transfer to a parchment-lined baking sheet. Pile the berry mixture into the center, leaving a 5cm border. Fold the edges of the dough over the fruit, pleating as you go to create the "rustic" look.
Pro Tip: Use a saucier or a small brush to apply the egg wash only to the exposed pastry. This promotes the Maillard reaction, giving you that deep, golden-brown finish.
Step 5: Thermal Execution
Bake at 200 degrees Celsius (400 degrees Fahrenheit) for 35 to 45 minutes. You are looking for the fruit to be bubbling in the center and the crust to be deeply browned. If the juice is not bubbling, the cornstarch has not reached its thickening temperature.
Pro Tip: Place the baking sheet on the lowest rack for the first 15 minutes to render the fat in the bottom crust quickly. This creates a moisture barrier that prevents the fruit juice from seeping through.
Section B: Prep & Timing Fault-Lines:
The most common human error is "The Rush." If you roll out the dough while it is still too cold, it will crack; if it is too warm, the butter will leak out before the structure sets. Always aim for a dough temperature of 15 degrees Celsius when rolling. Another timing error is pulling the tart too early. If the juices are purple but thin, the starch hasn't "set." You must see thick, slow-moving bubbles to ensure the molecular bond has formed.
THE VISUAL SPECTRUM
Section C: Thermal & Visual Troubleshooting:
Referencing the Masterclass photo, notice the scorched pastry perimeters. This is not "burnt"; it is "caramelized." If your tart looks pale and anemic, your oven temperature is likely calibrated too low. Use an oven thermometer to verify. If the berries look dull or "matte," they have dried out. A quick fix is to brush the finished fruit with a warm apricot glaze to restore the sheen. If the crust is slumped and lost its shape, the dough was too warm when it entered the oven. Chill the assembled tart for 10 minutes in the freezer before baking to "shock" the fats into staying put.
THE DEEP DIVE
Macro Nutrition Profile:
A standard slice contains approximately 340 calories, 18g of fat, 42g of carbohydrates, and 4g of protein. The high fiber content from the berry skins helps mitigate the glycemic load of the sugar.
Dietary Swaps:
- Vegan: Substitute the butter with a high-quality vegan block (oil-based) and use an almond milk wash instead of egg.
- Gluten-Free: Use a 1-to-1 GF flour blend containing xanthan gum to maintain structural elasticity.
- Keto: This is difficult due to the fruit sugars, but a crust made of almond flour and erythritol can work if the berries are limited to raspberries (the lowest carb option).
Meal Prep & Reheating Science:
To maintain the molecular structure, never microwave a tart. The waves agitate water molecules, turning the crust into a rubbery mess. Reheat in a 150 degree Celsius oven for 10 minutes to re-crisp the fats. The tart can be frozen post-bake; the high sugar and fat content act as natural preservatives against ice crystallization.
THE KITCHEN TABLE
Why is my tart leaking juice everywhere?
Your starch-to-liquid ratio is off or the oven was too cool. Ensure you use the full 30g of cornstarch and that the filling reaches a full boil to activate the thickening properties.
Can I use a food processor for the dough?
Yes, but use the pulse function sparingly. Over-processing creates a "tough" dough by smashing the fat molecules too small, which prevents the formation of flaky layers.
My crust is tough and hard to chew. What happened?
You likely over-hydrated the dough or overworked it, developing too much gluten. Next time, add water one tablespoon at a time and stop as soon as it clumps.
How do I prevent the bottom from being soggy?
Pre-heat a baking stone or an inverted baking sheet in the oven. Sliding your tart tray directly onto a hot surface ensures the bottom crust sears and sets instantly.

