
Listen up. We are not just making toast; we are engineering a structural masterpiece where the tensile strength of gluten meets the chaotic geometry of the Walnut Raisin Bread inclusion. If you have ever sliced into a loaf only to have a cavernous void where a raisin should be, or watched your expensive walnuts tumble onto the floor like structural failures in a condemned building, this audit is for you. We are hunting for the perfect crumb. We want a crust that shatters like glass but holds its payload with the tenacity of industrial adhesive. This is about the physics of hydration and the chemistry of the Maillard reaction. We are going to aerate our dough to the point of near-collapse before reinforcing it with the earthy, tannic crunch of toasted walnuts and the syrupy, viscous explosion of rehydrated raisins. This is high-stakes baking where every gram of water and every degree of ambient temperature is a variable in your success matrix. Prepare for a sensory overhaul.
THE DATA MATRIX
| Metric | Specification |
|---|---|
| Prep Time | 45 Minutes |
| Execution Time | 4 Hours |
| Yield | 2 Large Boules |
| Complexity (1-10) | 7 |
| Estimated Cost per Serving | $0.85 |
THE GATHERS
Ingredient Protocol:
- 500g / 4 cups Bread Flour (High Protein)
- 375ml / 1.5 cups Filtered Water (90 degrees F)
- 10g / 2 tsp Fine Sea Salt
- 5g / 1.5 tsp Instant Yeast
- 150g / 1.25 cups Toasted Walnut Halves
- 150g / 1 cup Flame Raisins
- 50ml / 0.25 cup Boiling Water (for raisin hydration)
- 15ml / 1 tbsp Honey or Malt Syrup
Section A: Ingredient Quality Audit:
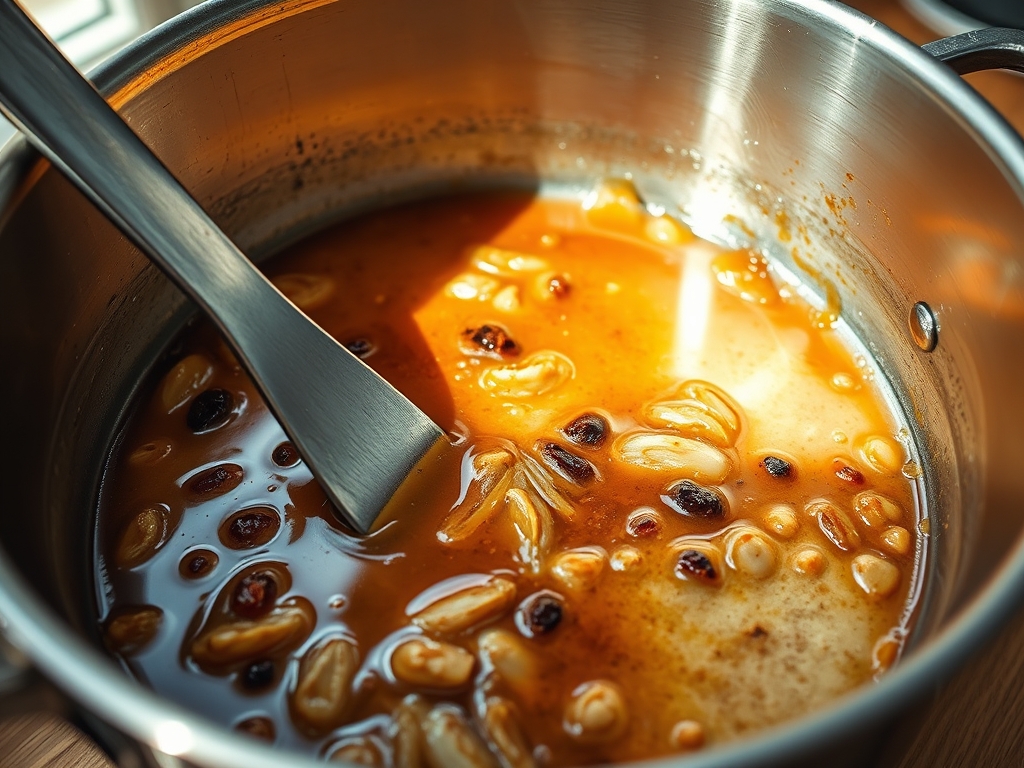
The most common failure point in Walnut Raisin Bread is the "moisture thief" phenomenon. Dried raisins are hygroscopic; they will literally suck the hydration out of your dough, leaving the surrounding crumb dry and brittle. To fix this, you must infuse your raisins with hot water or tea for twenty minutes prior to mixing. Drain them thoroughly and pat dry. If your walnuts taste bitter, they have likely oxidized. Always toast your nuts at 350 degrees F for eight minutes to render the oils and neutralize the tannins before they touch the flour. If your yeast fails to bloom, check the expiration; a dead leavening agent is a non-starter in a heavy-inclusion loaf.
THE MASTERCLASS
Step 1: The Autolyse Phase
Combine your flour and 90-degree water in a large ceramic bowl. Mix until no dry flour remains. Let this slurry sit for thirty minutes. This allows the proteins to hydrate and begin forming gluten chains without the interference of salt or yeast.
Pro Tip: Use a digital scale for this. Volumetric measurements are for amateurs. Precision in hydration ensures the dough has the elasticity to expand around the heavy walnuts without tearing.
Step 2: Inoculation and Development
Sprinkle the yeast, salt, and honey over the dough. Use your hand as a claw to fold the dough over itself, incorporating the ingredients. Perform a series of "stretch and folds" every thirty minutes for two hours. This builds a vertical structure that will eventually support the weight of the fruit.
Pro Tip: Use a bench scraper to keep your work surface clean. This tool is essential for manipulating high-hydration doughs without adding excess flour, which would ruin the crumb density.
Step 3: The Inclusion Integration
Spread the dough flat on a clean surface. Distribute the toasted walnuts and plumped raisins evenly across the surface. Fold the dough like a letter to laminate the inclusions into the layers. This prevents the "clumping" effect where all the fruit sinks to the bottom.
Pro Tip: The science here is about seed surface adhesion. By patting the raisins dry before adding them, you ensure the dough sticks to the fruit rather than sliding off a film of moisture.
Step 4: Bulk Fermentation and Shaping
Place the dough in a transparent container to monitor growth. Once it has doubled in size and shows visible gas bubbles, divide it. Shape into tight rounds by tensioning the surface of the dough against the counter.
Pro Tip: A banneton basket dusted with rice flour is the professional choice here. It wicks moisture from the surface, creating a skin that will eventually become that coveted shattered-glass crust.
Step 5: The Thermal Blast
Preheat a Dutch oven to 475 degrees F. Score the top of the loaf with a sharp blade to control the expansion. Bake covered for 20 minutes to trap steam, then uncovered for 15 minutes to finalize the color.
Pro Tip: The steam allows the dough to aerate fully before the crust sets. Without steam, the inclusions near the surface will burn before the interior is fully baked.
Section B: Prep & Timing Fault-Lines:
Timing is the silent killer. If you over-proof the dough, the weight of the walnuts will cause the gluten structure to collapse, resulting in a flat, dense brick. If your kitchen is below 70 degrees F, your fermentation will stall. Use an oven with the light on as a makeshift proofing box. Conversely, if the water is too hot (over 110 degrees F), you will kill the yeast instantly. Always use an infrared thermometer to verify your thermal environment.
THE VISUAL SPECTRUM
Section C: Thermal & Visual Troubleshooting:
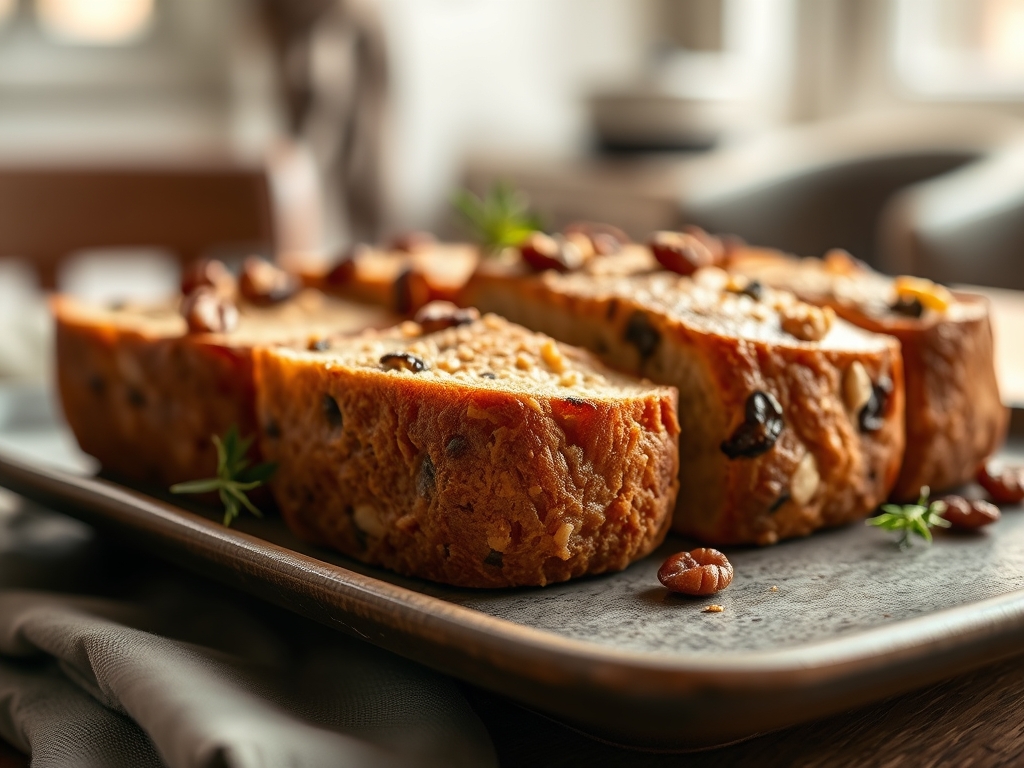
Referencing the Masterclass photo, you are looking for a "mahogany" crust, not a pale tan. If your bread looks dull, you likely under-baked it or failed to create enough steam. If the raisins on the surface look like charred pebbles, they weren't tucked deep enough into the dough during the shaping phase. A perfect loaf should show a "shaggy" ear where the score mark was made; this indicates a powerful "oven spring." If your walnuts appear purple or grey inside the crumb, that is a natural reaction between the nut tannins and the flour pH; it is safe to eat, though slightly unappealing. To prevent this, don't over-mix once the nuts are added.
THE DEEP DIVE
Macro Nutrition Profile:
A standard slice (approx. 60g) contains roughly 180 calories, 5g of protein, 28g of carbohydrates, and 6g of healthy fats from the walnuts. The raisins provide a quick hit of glucose, while the walnuts offer omega-3 fatty acids and fiber.
Dietary Swaps:
- Vegan: This recipe is naturally vegan if you use malt syrup instead of honey.
- Keto: Replace flour with a mix of almond flour and vital wheat gluten; however, the raisins are high-sugar, so swap them for dried berries or seeds.
- Gluten-Free: Use a high-quality GF bread flour blend with xanthan gum. Increase the water by 10 percent as GF flours are extremely thirsty.
Meal Prep & Reheating Science:
To maintain the molecular structure, never refrigerate bread; it accelerates staling via starch retrogradation. Store at room temperature in a paper bag for 48 hours. To reheat, use a toaster or a 350-degree oven for five minutes. This re-gelatinizes the starches and restores the "crunch" to the crust.
THE KITCHEN TABLE
Why are my walnuts falling out of the bread?
You likely lacked enough surface tension during shaping or added the nuts too late. Ensure the dough is tacky enough to grip the inclusions, and use the lamination method to lock them into the gluten matrix.
Can I use golden raisins instead of dark ones?
Absolutely. Golden raisins offer a more piquant, acidic profile compared to the deep, jammy sweetness of dark raisins. They also resist burning slightly better due to different sugar concentrations.
My bread is gummy in the center. What happened?
You cut it too early! The internal structure of the bread continues to set as it cools. If you slice it while hot, the steam escapes instantly, leaving a wet, compressed crumb. Wait at least two hours.
How do I get that professional flour-dusted look?
Use a sifter to apply a thin layer of rice flour to the dough before scoring. Rice flour has a higher burning point than wheat flour, so it stays white while the crust turns dark brown.

