
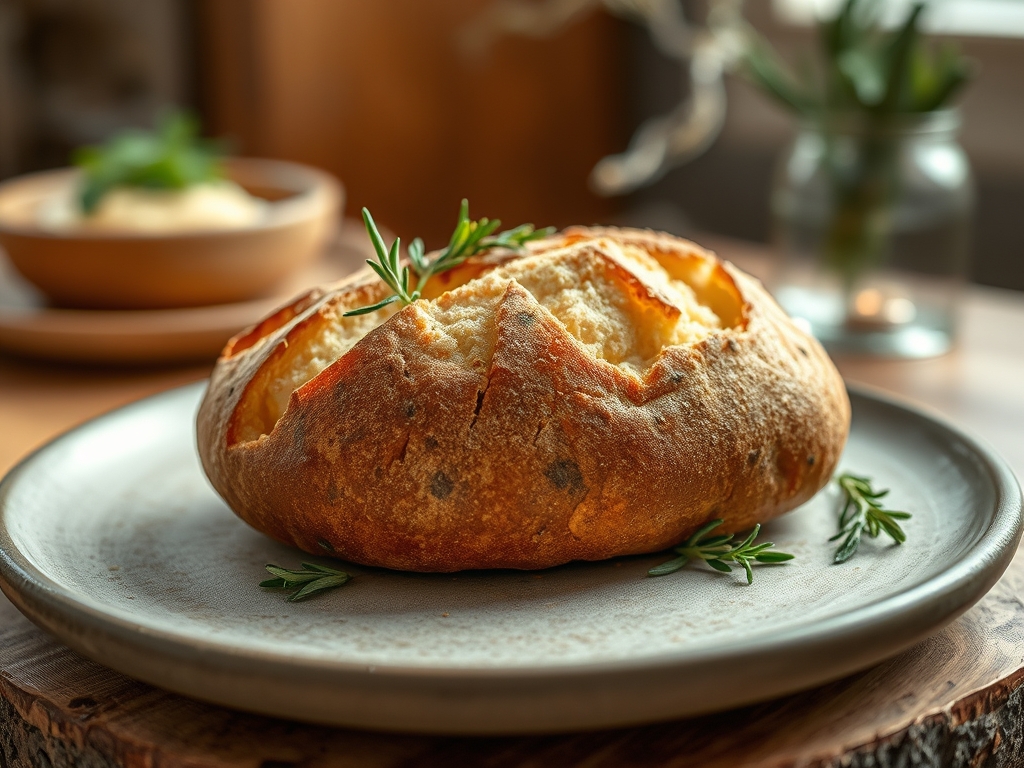
Listen to that sound. It is not just a crackle; it is a structural failure of a high-tension gluten network under thermal duress. We are talking about the quintessential Rosemary Sourdough, a loaf that demands more than just a passing glance. It requires a full forensic audit of your kitchen infrastructure. When you slice into a properly executed boule, the aroma of volatile rosemary oils should hit you like a sensory freight train. We are looking for a crust so shattered and glass-like that it requires a permit, paired with an interior crumb that is airy, translucent, and elastic. This is not hobbyist baking. This is a study in terpene volatility and moisture migration. If your kitchen smells like a pine forest and a fermentation lab had a high-velocity collision, you are on the right track. We are here to optimize your starch gelatinization and ensure your herbaceous inclusions do not just sit there; they must infuse the very soul of the dough. Let us get to work.
THE DATA MATRIX
| Metric | Specification |
|---|---|
| Prep Time | 45 Minutes (Active) |
| Execution Time | 24 to 36 Hours (Fermentation Dependent) |
| Yield | 2 Large Boules (Approx. 900g each) |
| Complexity (1-10) | 8 (Advanced Fermentation Management) |
| Estimated Cost per Serving | $0.85 USD |
THE GATHERS
Ingredient Protocol:
- Active Sourdough Starter: 200g / 0.85 cups (100% hydration, peaked)
- Artisan Bread Flour: 800g / 6.4 cups (Minimum 12.7% protein)
- Whole Wheat Flour: 100g / 0.8 cups (For enzymatic activity)
- Filtered Water: 650ml / 2.75 cups (Target temp: 26C / 78F)
- Fine Sea Salt: 20g / 1.2 tablespoons
- Fresh Rosemary: 15g / 3 tablespoons (Finely minced to release oils)
- Extra Virgin Olive Oil: 20ml / 1.3 tablespoons (To coat the inclusions)
Section A: Ingredient Quality Audit:
If your rosemary feels like dry pine needles, your terpene profile is compromised. Sub-par herbs lack the viscous oils necessary for a true aromatic infusion. The fix? Briefly massage the minced rosemary with a tiny amount of olive oil before folding. This protects the herbs from oxidizing and helps infuse the fat-soluble flavor compounds throughout the dough. If your flour is low-protein "all-purpose" masquerading as bread flour, your gluten network will collapse under the weight of the hydration. Technical fix: Add 15g of vital wheat gluten to the dry mix to reinforce the structural integrity. Finally, if your water is heavily chlorinated, it will act as a biocide against your wild yeast. Use a charcoal filter or boil and cool your water to ensure a thriving microbial colony.
THE MASTERCLASS
Step-by-Step Execution:
1. The Autolyse Phase
Combine your flours and water in a large ceramic bowl until no dry spots remain. Cover and let rest for 60 minutes. This allows the flour to fully hydrate and initiates the enzymatic breakdown of starches without the interference of salt or yeast.
Pro Tip: Use a digital scale for this. Volumetric measurements are the enemy of consistency. The science here is "hydrolysis," where enzymes like protease begin softening the gluten, making the dough more extensible for the long haul.
2. Inoculation and Incorporation
Dimple your active starter and salt into the hydrated flour. Use a "pincer" method to squeeze the dough together until the starter is fully integrated. This is where the fermentation clock officially starts.
Pro Tip: Keep a small bowl of warm water nearby to dip your hands in. This prevents the dough from sticking to your skin and allows you to aerate the mixture more effectively without adding excess flour that would throw off your hydration ratios.
3. The Lamination and Herb Infusion
After the first 30 minutes of bulk fermentation, stretch the dough out into a large rectangle on a clean surface. Sprinkle your minced rosemary evenly across the surface. Fold the dough back onto itself to trap the herbs in layers.
Pro Tip: Use a stainless steel bench scraper to manage the dough during this phase. By laminating the herbs rather than just mixing them, you create "pockets" of flavor that prevent the rosemary from interfering with the primary gluten strands.
4. Bulk Fermentation and Structural Folds
Perform four sets of "stretch and folds" every 30 minutes. Reach under the dough, pull it upward until you feel resistance, and fold it over. Monitor the dough until it increases in volume by about 50 percent and shows visible gas bubbles.
Pro Tip: This is about "mechanical development." Each fold aligns the gluten fibers. If the dough feels too slack, increase the frequency of your folds. Use a transparent container so you can monitor the viscous bubbles forming at the base.
5. Shaping and Cold Retardation
Turn the dough onto a floured surface. Divide and pre-shape into rounds. After a 20-minute rest, perform the final shaping by creating high surface tension. Place the loaves into bannetons and refrigerate for 12 to 24 hours.
Pro Tip: Cold fermentation is where the magic happens. The yeast slows down, but the bacteria continue to produce organic acids. This creates the "sour" in sourdough and prepares the crust for the Maillard reaction during the bake.
6. The High-Heat Thermal Event
Preheat a Dutch oven to 260C (500F). Score the dough deeply with a sharp lame. Drop the loaf into the pot, add two ice cubes for steam, and bake covered for 20 minutes. Remove the lid and finish at 230C (450F) for another 20 minutes.
Pro Tip: The ice cubes create an immediate steam injection that keeps the "skin" of the dough supple, allowing for maximum "oven spring" before the crust sets. This is essential for achieving that shattered-glass texture.
Section B: Prep & Timing Fault-Lines:
The most common human error is "over-proofing" during the bulk stage. If your kitchen is over 25C (77F), the fermentation will accelerate exponentially. If the dough looks like soup and loses all shape, you have pushed it too far. Technical fix: Shorten the bulk fermentation and move the dough to the fridge earlier. Temperature control is your primary lever. Use an infrared thermometer to check your dough temperature; if it exceeds 28C (82F), your yeast will produce off-flavors that mask the delicate rosemary notes.
THE VISUAL SPECTRUM
Section C: Thermal & Visual Troubleshooting:
Look at the Masterclass photo. Notice the "blistering" on the crust; these tiny bubbles are the hallmark of a long, cold ferment. If your loaf is smooth and matte, you likely skipped the cold retard or your fridge is not cold enough. If the scoring did not "bloom" into a beautiful ear, your steam levels were insufficient or your blade was dull. A dull blade drags through the dough rather than slicing it, causing the gases to escape unevenly. If the bottom of the loaf is burnt while the top is pale, your oven's bottom heating element is too aggressive. Place a baking sheet on the rack below your Dutch oven to act as a heat shield and normalize the thermal distribution.
THE DEEP DIVE
Macro Nutrition Profile:
Sourdough is a fermented powerhouse. A standard slice (approx. 50g) contains roughly 185 calories, 4g of protein, and 36g of complex carbohydrates. The long fermentation process breaks down much of the gluten and phytic acid, making it significantly easier on the digestive system than commercial bread.
Dietary Swaps:
- Vegan: This recipe is naturally vegan. Ensure your starter is fed with high-quality flour and water.
- Keto: Sourdough is inherently high-carb. For a lower-carb alternative, replace 30% of the flour with almond flour, though you will sacrifice the "shattered" crust texture.
- Gluten-Free: This requires a dedicated GF starter (usually brown rice based) and a blend of sorghum, millet, and tapioca flours with xantham gum for structure.
Meal Prep & Reheating Science:
To maintain the molecular structure, never refrigerate finished bread; it accelerates staling via starch retrogradation. Store at room temperature in a paper bag for 48 hours. To reheat, mist the crust with water and bake at 175C (350F) for 10 minutes. This "re-gelatinizes" the starches and restores the crunch.
THE KITCHEN TABLE
Why is my rosemary sourdough gummy inside?
This usually indicates "under-baking" or cutting the loaf while it is still hot. The internal structure needs to set as it cools. Always wait at least two hours before slicing to allow moisture to redistribute.
Can I use dried rosemary instead of fresh?
You can, but the terpene profile will be muted. Use half the amount of dried rosemary and rehydrate it in a teaspoon of warm water before adding it to the dough to prevent it from absorbing moisture from the crumb.
My bread did not rise in the oven. What happened?
This is likely "under-active" starter or over-proofing. If the yeast has exhausted its fuel supply before it hits the oven, there is no gas left to expand. Ensure your starter is doubling in size within 4 to 6 hours before using.
How do I get a more sour flavor?
Extend the cold fermentation in the refrigerator. A 48-hour cold soak allows the lactobacillus to produce more acetic acid, resulting in a sharper, more piquant flavor profile that beautifully complements the earthy rosemary.

