
Listen to the sound of the crust. It is not a mere crackle; it is a tectonic shift occurring in real-time as the loaf cools. We are discussing the legendary Pain de Campagne. This is the structural backbone of French rustic baking. It is a loaf that demands respect for its high hydration levels and its complex, multi-grain architecture. When you tear into a proper Pain de Campagne, you are not just eating bread; you are consuming a history of fermentation and fire. The aroma is a heady mix of toasted nuttiness and a sharp, lactic tang that lingers on the palate. The crumb must be open and airy, a translucent honeycomb of gluten that shimmers under the kitchen lights. If your current baking routine feels like a flat, uninspired slog, it is time to upgrade your infrastructure. We are moving away from the pillowy, bleached-flour disasters of the supermarket aisle and stepping into the realm of high-extraction flours and wild yeast kinetics. Prepare for a sensory overhaul.
THE DATA MATRIX
| Metric | Specification |
|---|---|
| Prep Time | 45 Minutes (Active) |
| Execution Time | 18 – 24 Hours (Fermentation Included) |
| Yield | 2 Large Boules |
| Complexity (1-10) | 7 |
| Estimated Cost per Serving | $0.85 |
THE GATHERS
Ingredient Protocol:
- 800g / 6.25 cups Strong Bread Flour (12.5% protein minimum)
- 150g / 1.25 cups Whole Wheat Flour (High extraction)
- 50g / 0.5 cup Dark Rye Flour
- 750ml / 3.1 cups Filtered Water (Target temperature: 90F)
- 200g / 0.8 cup Active Sourdough Starter (Fed 6 hours prior)
- 20g / 1.2 tbsp Fine Sea Salt
- 5g / 1 tsp Diastatic Malt Powder (Optional for enhanced browning)
Section A: Ingredient Quality Audit:
If your flour feels gritty or lacks the ability to absorb water, you are likely dealing with low-protein "all-purpose" masquerading as bread flour. This will lead to a structural collapse during the final proof. To fix this, incorporate 2% vital wheat gluten by weight to reinforce the protein matrix. If your sourdough starter is sluggish or smells of pure vinegar rather than a fruity fermentation, it is over-acidified. Perform three "back-to-back" feedings every 12 hours at a 1:1:1 ratio to reset the pH balance and invigorate the yeast colony before you attempt the mix.
THE MASTERCLASS
1. The Autolyse Phase
Combine your flours and water in a large ceramic bowl until no dry spots remain. Cover and let rest for 60 minutes. This allows the enzymes to begin breaking down starches into sugars without the interference of salt or yeast.
Pro Tip: Use a digital scale for every measurement. Volumetric baking is for amateurs; mass-based measurements ensure that your hydration levels remain consistent to the milliliter, preventing a dough that is too viscous to handle.
2. Inoculation and Salt Integration
Dimple your active starter and salt into the autolysed dough. Use the "pincer method" to cut the starter into the mass, then fold the dough over itself until fully incorporated.
Pro Tip: A professional bench scraper is your best friend here. Use it to scoop and turn the dough, keeping your hands clean and maintaining the integrity of the developing gluten strands.
3. Bulk Fermentation and Structural Folds
Perform four sets of "stretch and folds" every 30 minutes. Reach under the dough, pull it upward until you feel resistance, and fold it over the center. This builds the tension required for a vertical spring in the oven.
Pro Tip: This process is about aeration. By folding the dough, you are trapping microscopic air pockets that the CO2 will later expand. This creates the "open crumb" visible in the Masterclass photo.
4. Cold Retardation
Place the shaped boules into floured bannetons and refrigerate for 12 to 18 hours. This slow fermentation allows the bacteria to produce organic acids, resulting in a deeper, more piquant flavor profile.
Pro Tip: Cold dough is easier to score. Use a lame (a specialized razor tool) to cut a deep "X" or a single long slash. This directs the steam escape and prevents the loaf from bursting at the base.
5. The Thermal Shock
Preheat a Dutch oven to 500F. Carefully drop the dough into the pot, cover with the lid, and reduce heat to 450F. Bake for 20 minutes covered, then 25 minutes uncovered to finish the crust.
Pro Tip: The lid traps steam released by the dough, which keeps the surface moist and allows for maximum expansion. Without steam, the crust sets too early, resulting in a dense, stunted loaf.
Section B: Prep & Timing Fault-Lines:
The most common failure in Pain de Campagne is "under-proofing." If your dough feels tight and springs back instantly when poked, it needs more time. If it deflates like a punctured balloon, it is over-proofed. The "finger-dent test" is your primary diagnostic tool. A slow, partial spring-back indicates the dough is at peak fermentation. Additionally, watch your ambient temperature. If your kitchen is below 70F, your bulk fermentation might take six hours instead of three. Use a proofing box or the "oven with the light on" trick to maintain a steady 78F environment.
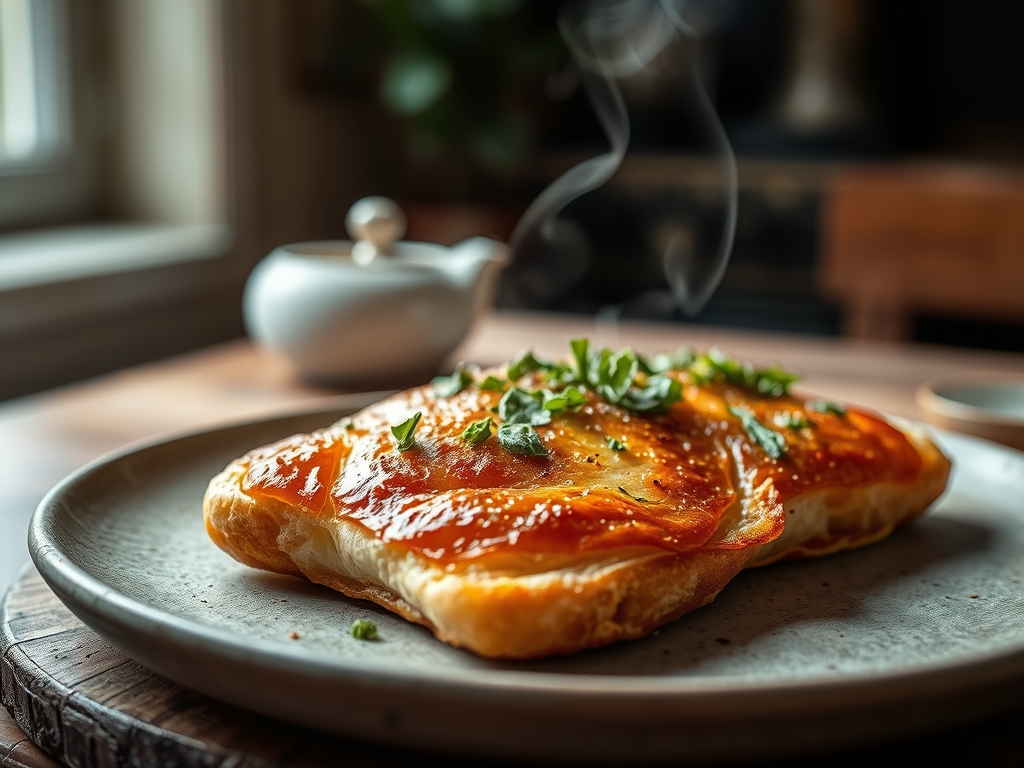
THE VISUAL SPECTRUM
Section C: Thermal & Visual Troubleshooting:
Look at the Masterclass photo above. Notice the "ear" (the raised flap of crust where the score was made) and the "blistering" on the surface. If your loaf is pale and smooth, you likely skipped the cold retard or your oven was not hot enough to trigger the Maillard reaction. If the bottom of the loaf is burnt while the top is blonde, place a baking sheet on the rack below your Dutch oven to deflect the direct radiant heat. A dull, matte crust usually indicates a lack of steam; ensure your Dutch oven lid has a tight seal or add a small ice cube into the pot just before closing the lid to infuse the environment with extra moisture.
THE DEEP DIVE
Macro Nutrition Profile
A standard 100g slice of Pain de Campagne contains approximately 240 calories, 8g of protein, 48g of carbohydrates, and 3g of fiber. The inclusion of rye and whole wheat increases the micronutrient density, providing essential B vitamins and minerals like magnesium and iron compared to standard white bread.
Dietary Swaps
- Vegan: This recipe is naturally vegan. Ensure your starter is maintained with flour and water only.
- Gluten-Free: This specific infrastructure relies on gluten. For a GF version, replace flours with a blend of sorghum, teff, and buckwheat, adding 3% psyllium husk to mimic the viscous elasticity of wheat dough.
- Keto: High-protein almond flour and flaxseed meal can be used, though the fermentation kinetics will be entirely different.
Meal Prep & Reheating Science
To maintain the molecular structure, never refrigerate bread. Store it cut-side down on a wooden board for 48 hours. For long-term storage, slice and freeze. To reheat, toast directly from frozen. This triggers a secondary Maillard reaction, crisping the exterior while the interior remains moist due to the rapid evaporation of internal ice crystals.
THE KITCHEN TABLE
Why is my crumb tight and gummy?
This usually indicates under-baking or cutting the loaf while it is still hot. The internal structure needs at least two hours to set. If you cut it early, the steam collapses the cell walls into a gelatinized mess.
Can I use commercial yeast instead?
Yes, but you will lose the piquant complexity of the sourdough. Use 5g of instant yeast and reduce the bulk fermentation time to 2 hours. The structural folds remain mandatory for the "Country Style" texture.
My dough is a sticky puddle. Help!
Your flour likely has a lower absorption rate. Next time, hold back 50ml of water. For the current batch, perform "slap and folds" on the counter to build tension without adding excess flour, which would toughen the crumb.
What is the best way to clean my proofing baskets?
Never use soap. Let the flour dry completely, then use a stiff brush to remove the residue. If mold appears, bake the empty baskets at 250F for 20 minutes to sterilize the organic fibers.

